

在 Python 編程裡,我們如果能夠融合日常生活裡的網上服務,便能夠發揮強大的編程功能,使我們的生活更為順暢。
其中,許多人會使用 Google 的服務,就如最常見的 Gmail 電郵服務、Google Sheets 試算表服務、Youtube 服務等。
如果我們能夠簡單透過 Python 去安全地存取我們的 Google 數據,有許多地方可以讓我們使用 Python 獲得意想不到的效果。
因此,我們接下來會開始一個新的系列,介紹如何使用官方 Google API Python Client 存取 Google 的服務。
有甚麼 Google 的服務可以存取?
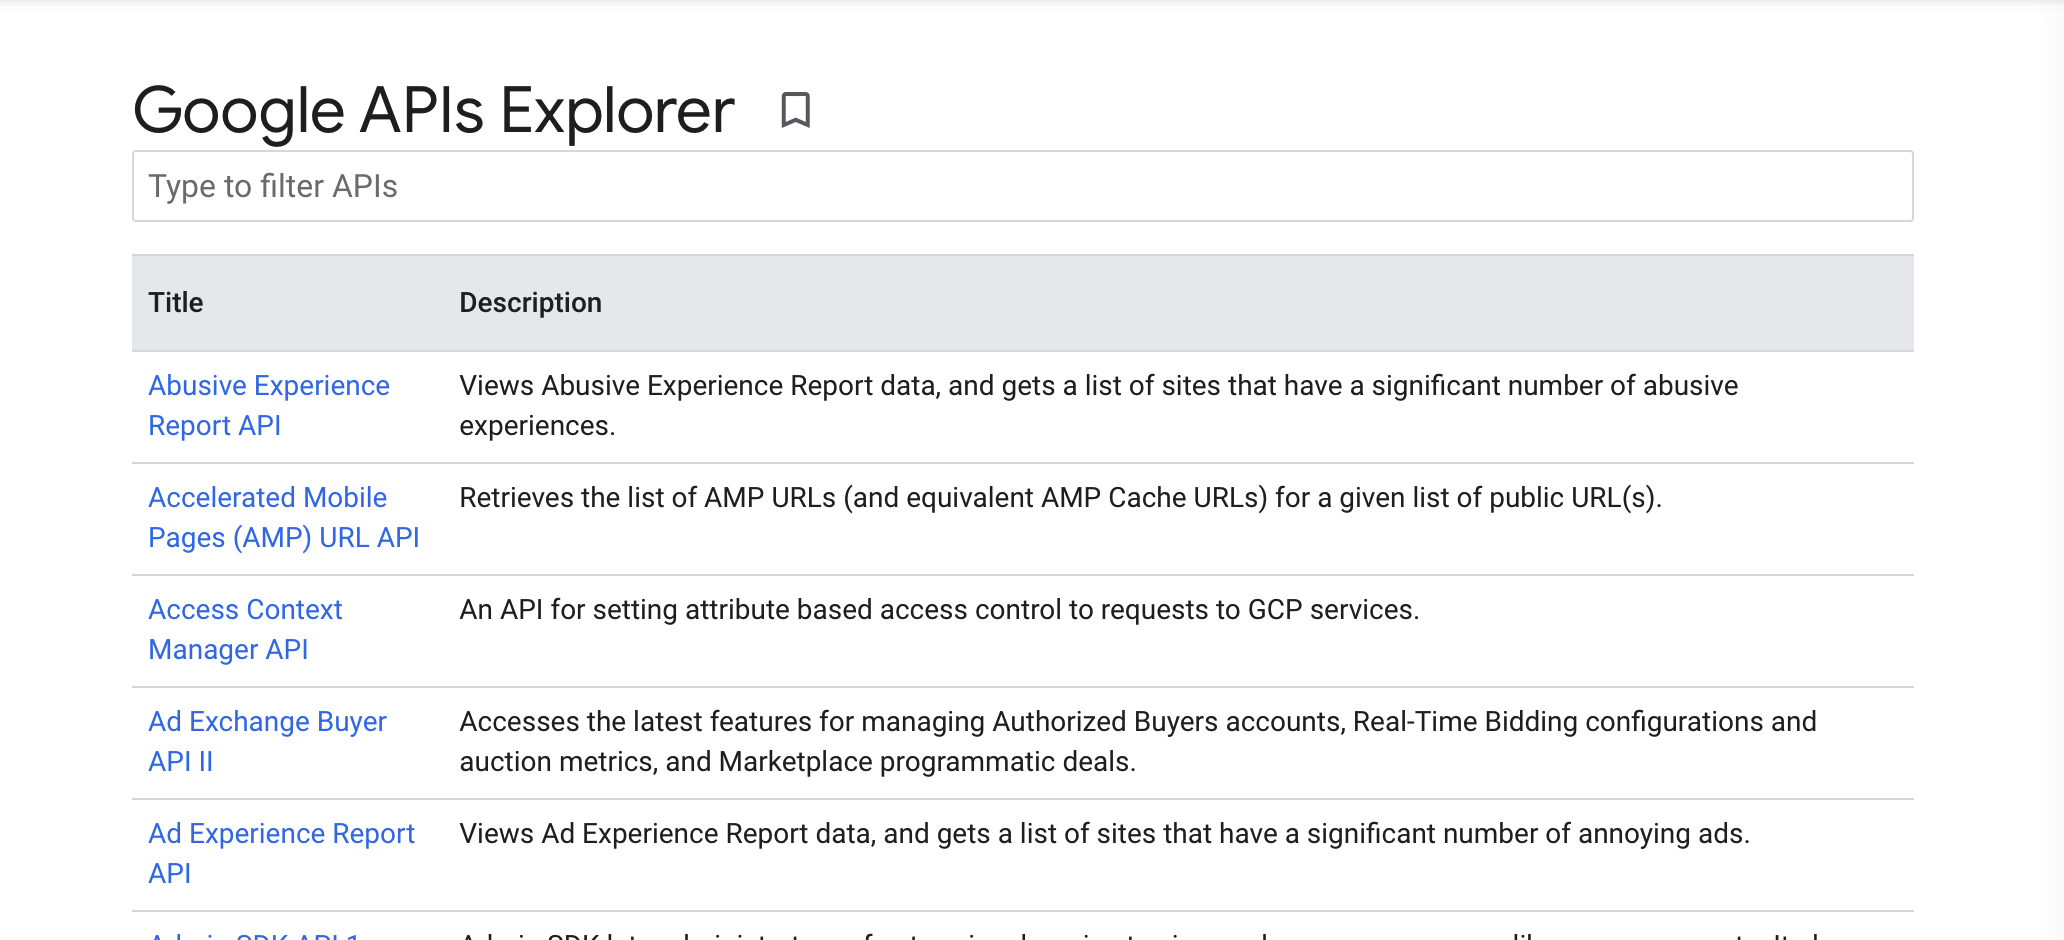
這裡我們就要介紹一下 Google 的 API Explorer。
顧名思義,這個 API Explorer 就是讓我們瀏覽哪些 Google 的服務可以用編程的方式獲取。一些我們認為比較有趣的服務包括:
- Drive API:讓您可以讀取和輸出檔案至個人的 Google Drive
- Google Sheets API:讓您可以在 Google Sheets 試算表裡存取輸出數據
- Gmail API:讓您可以存取您的電子郵件和發出新的郵件
您又是否找到有趣的 Google API?
如何使用 Python 存取 Google 的 API?
在開始教學之前,我們先要學習一下如何在 Python 編程裡存取 Google 的 API。
大致上來說,我們需要以下幾項的設置:
- 告訴 Google 我們需要甚麼服務的 API (例如 Gmail API)
- 讓用家(例如我們自己)登入 Google 帳戶後,賦予我們 Python 程式權限
- 在 Python 裡儲存登入資訊,讓我們不用每次都要求用家登入 Google 帳戶
開始咯!
第 1 步:啟用所需的 Google API
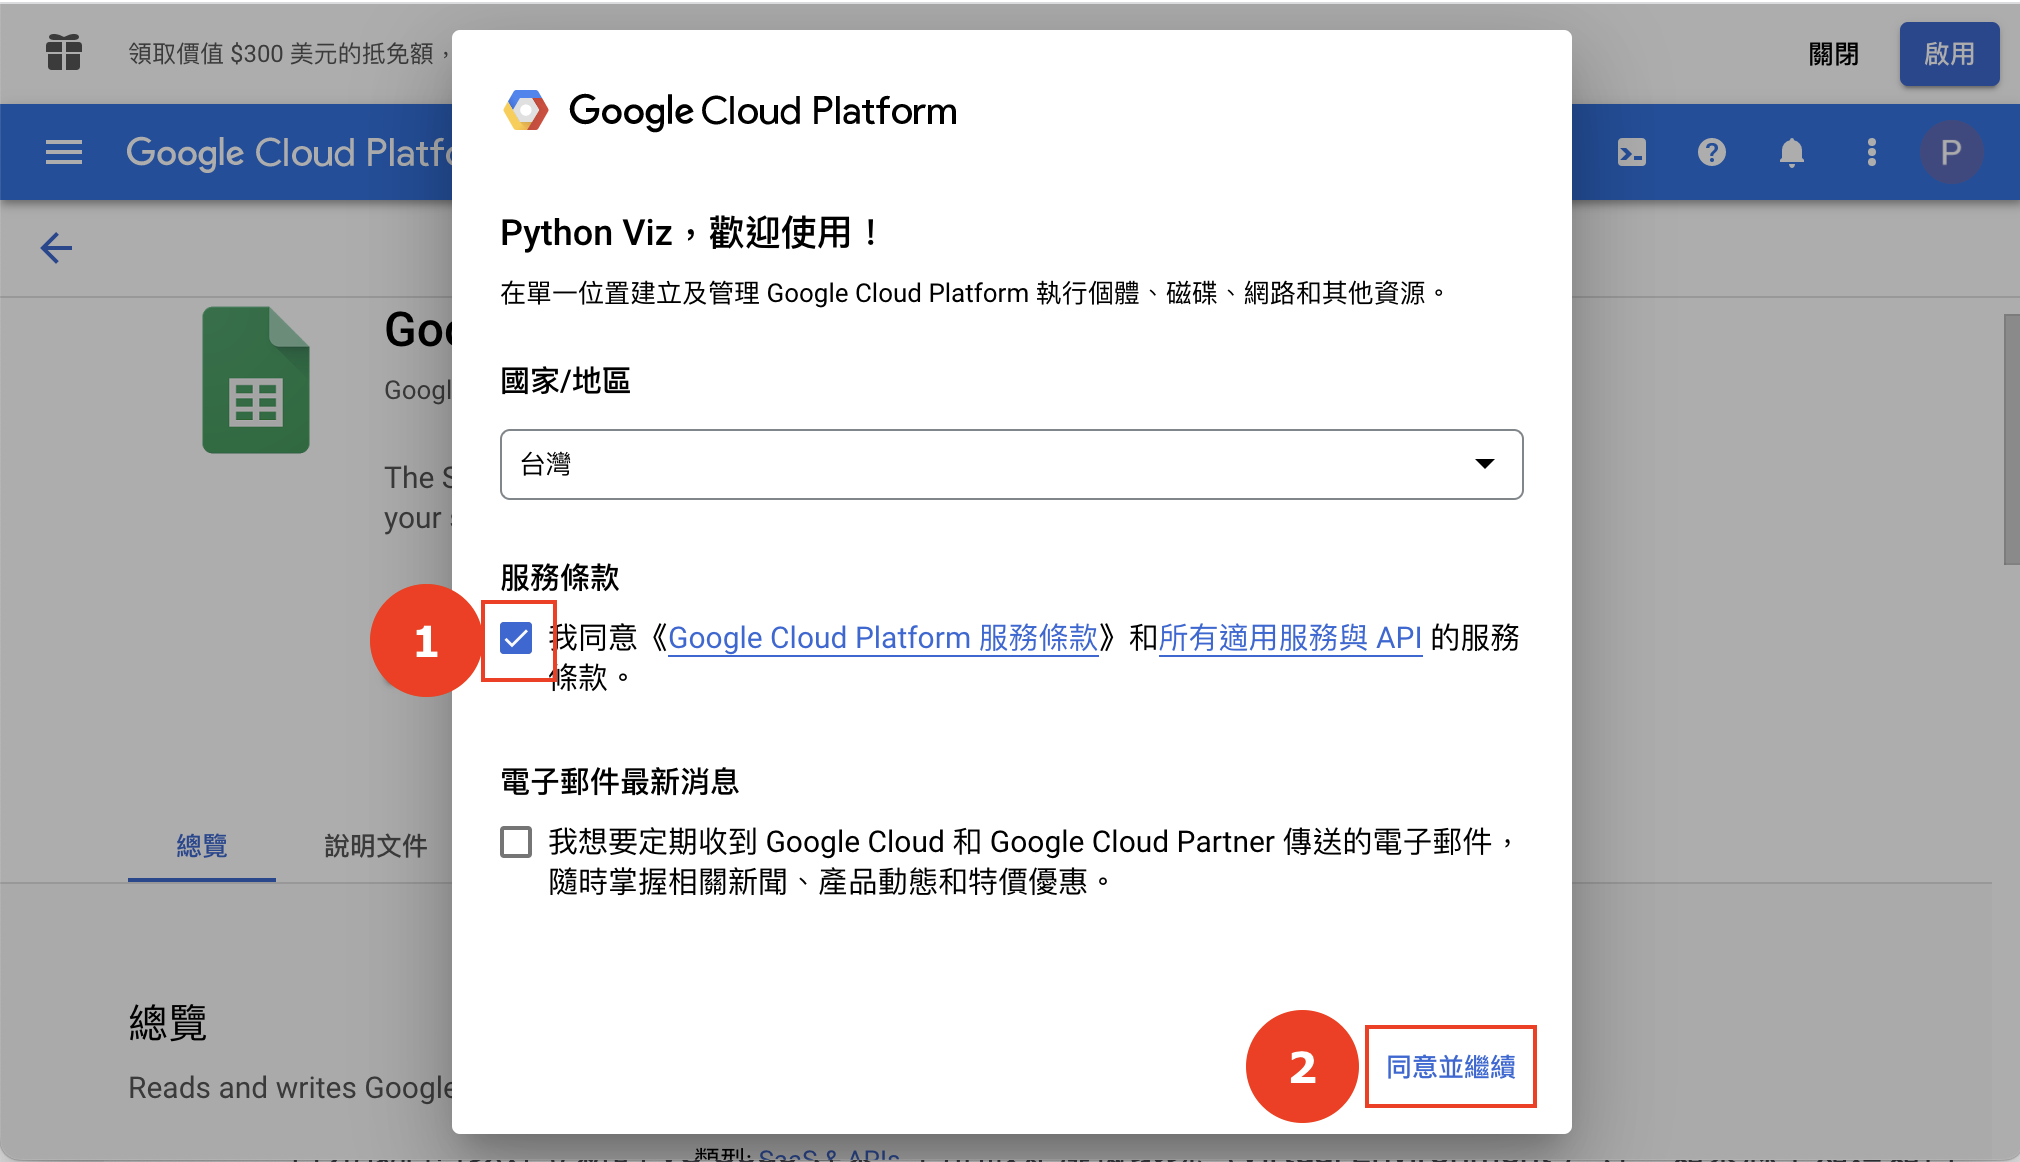
這裡我們使用 Google Sheets API 作例子。您也可以使用其他所需的 API 取代以下的步驟。
首先我們到 Google Cloud Console 的 Google Sheets API 的頁面,按一下同意使用條款並繼續。
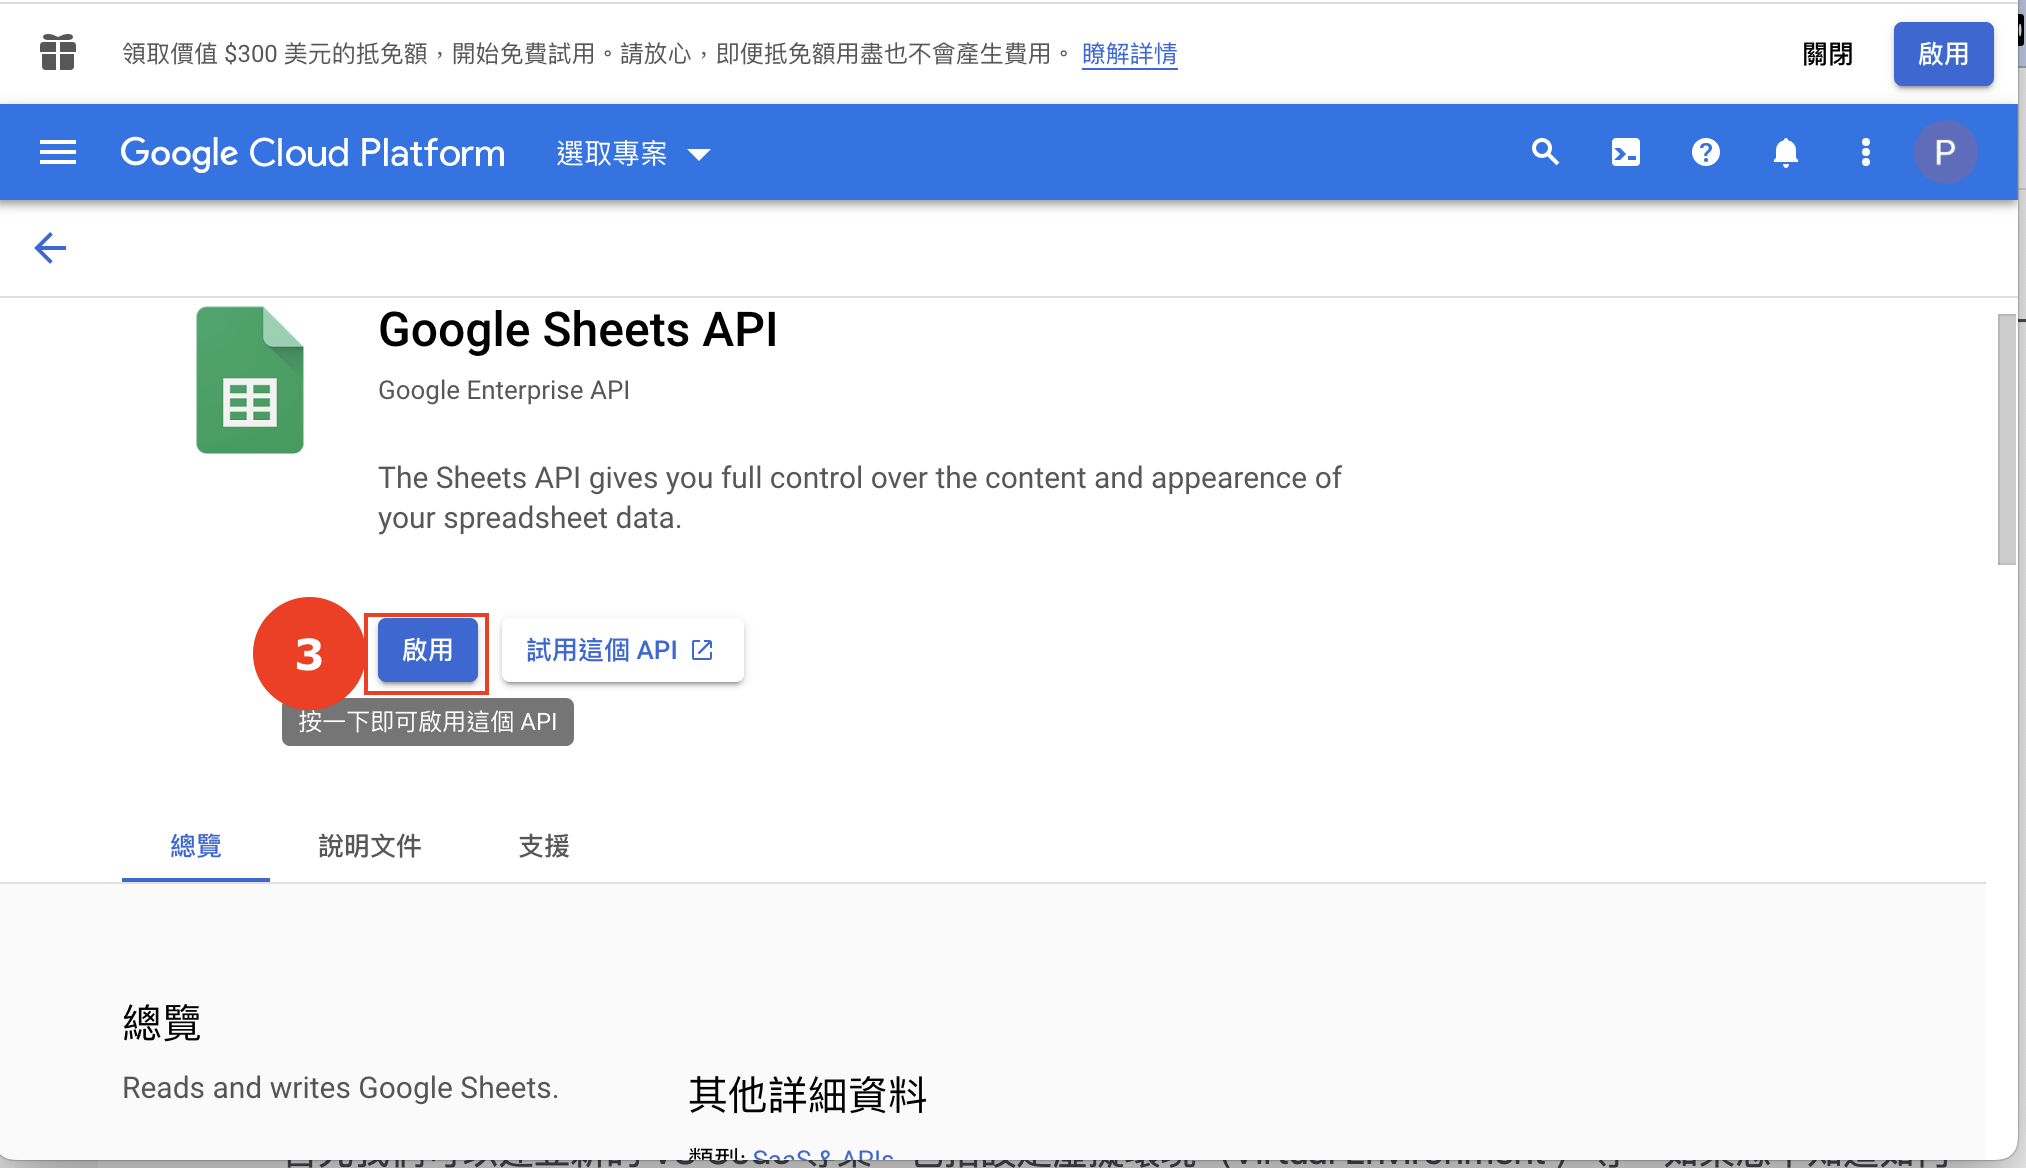
看到 Google Sheets API 後,我們按一下啟用:
等了一會後,頁面應該自動跳轉到「已啟用的 API 和服務」。我們會見到 Google Sheets API 已經啟用:

第 2 步:設立 OAuth 驗證
啟用了 Google Sheet API 後,我們需要設立一個 OAuth 的頁面讓我們的使用者(其實是我們自己)可以透過登入自己的 Google 帳戶,使我們的應用程式可以存取我們的 Google Sheets。
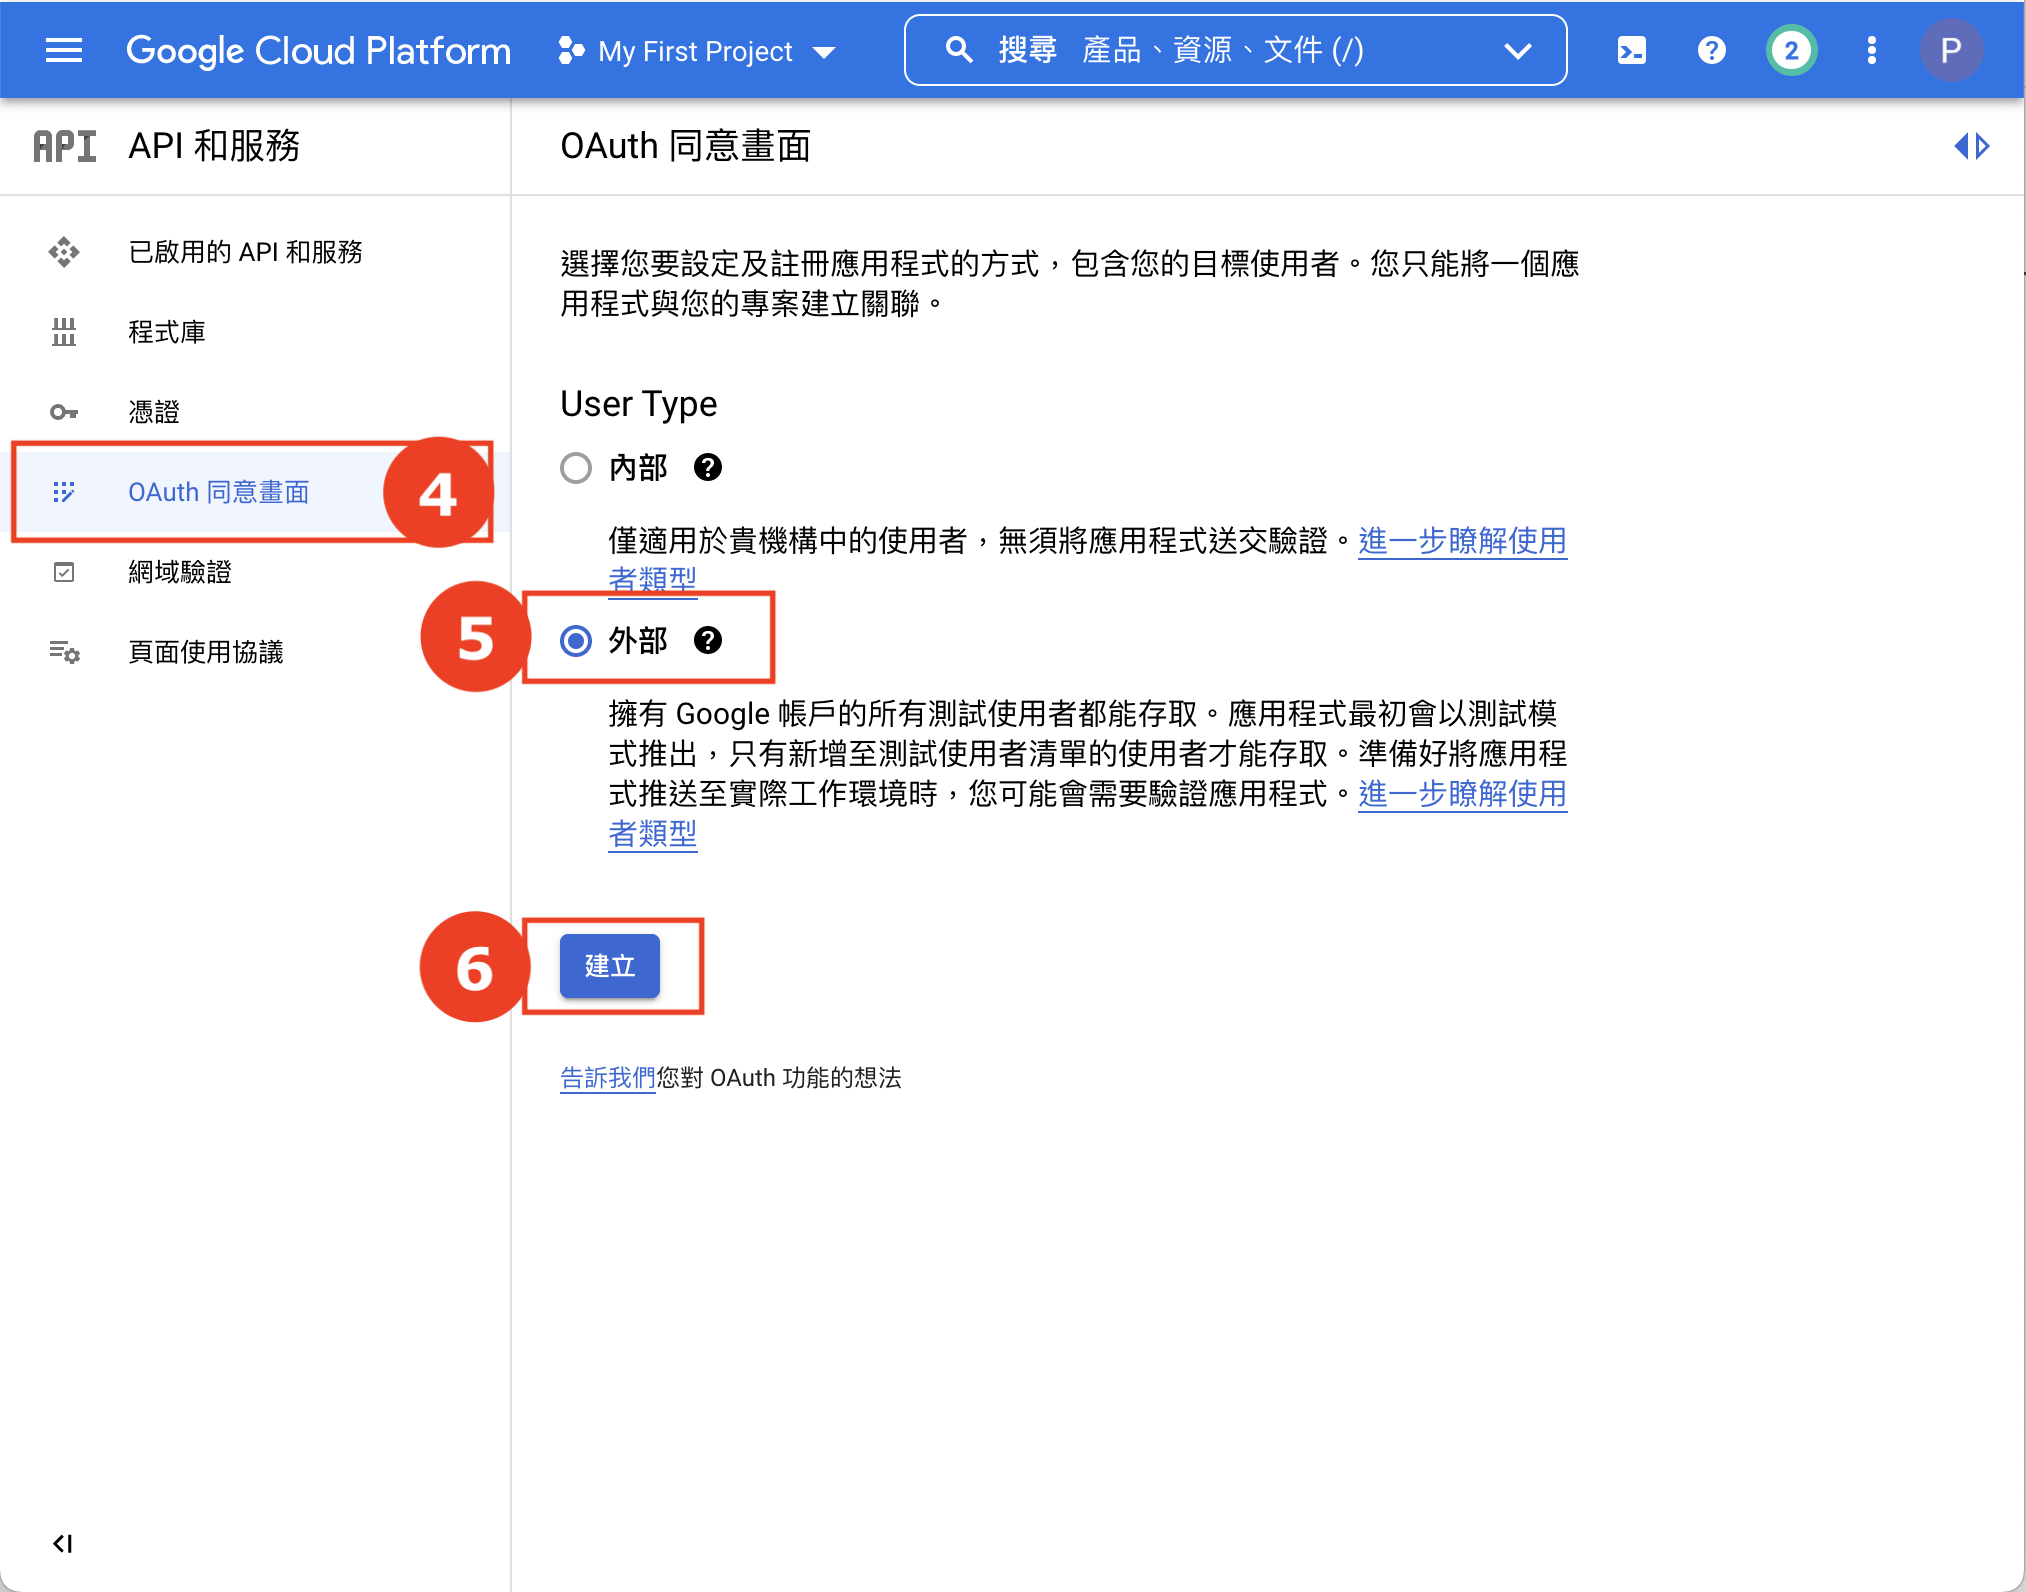
首先我們到左邊選擇「OAuth 同意畫面」,然後選擇「外部」:
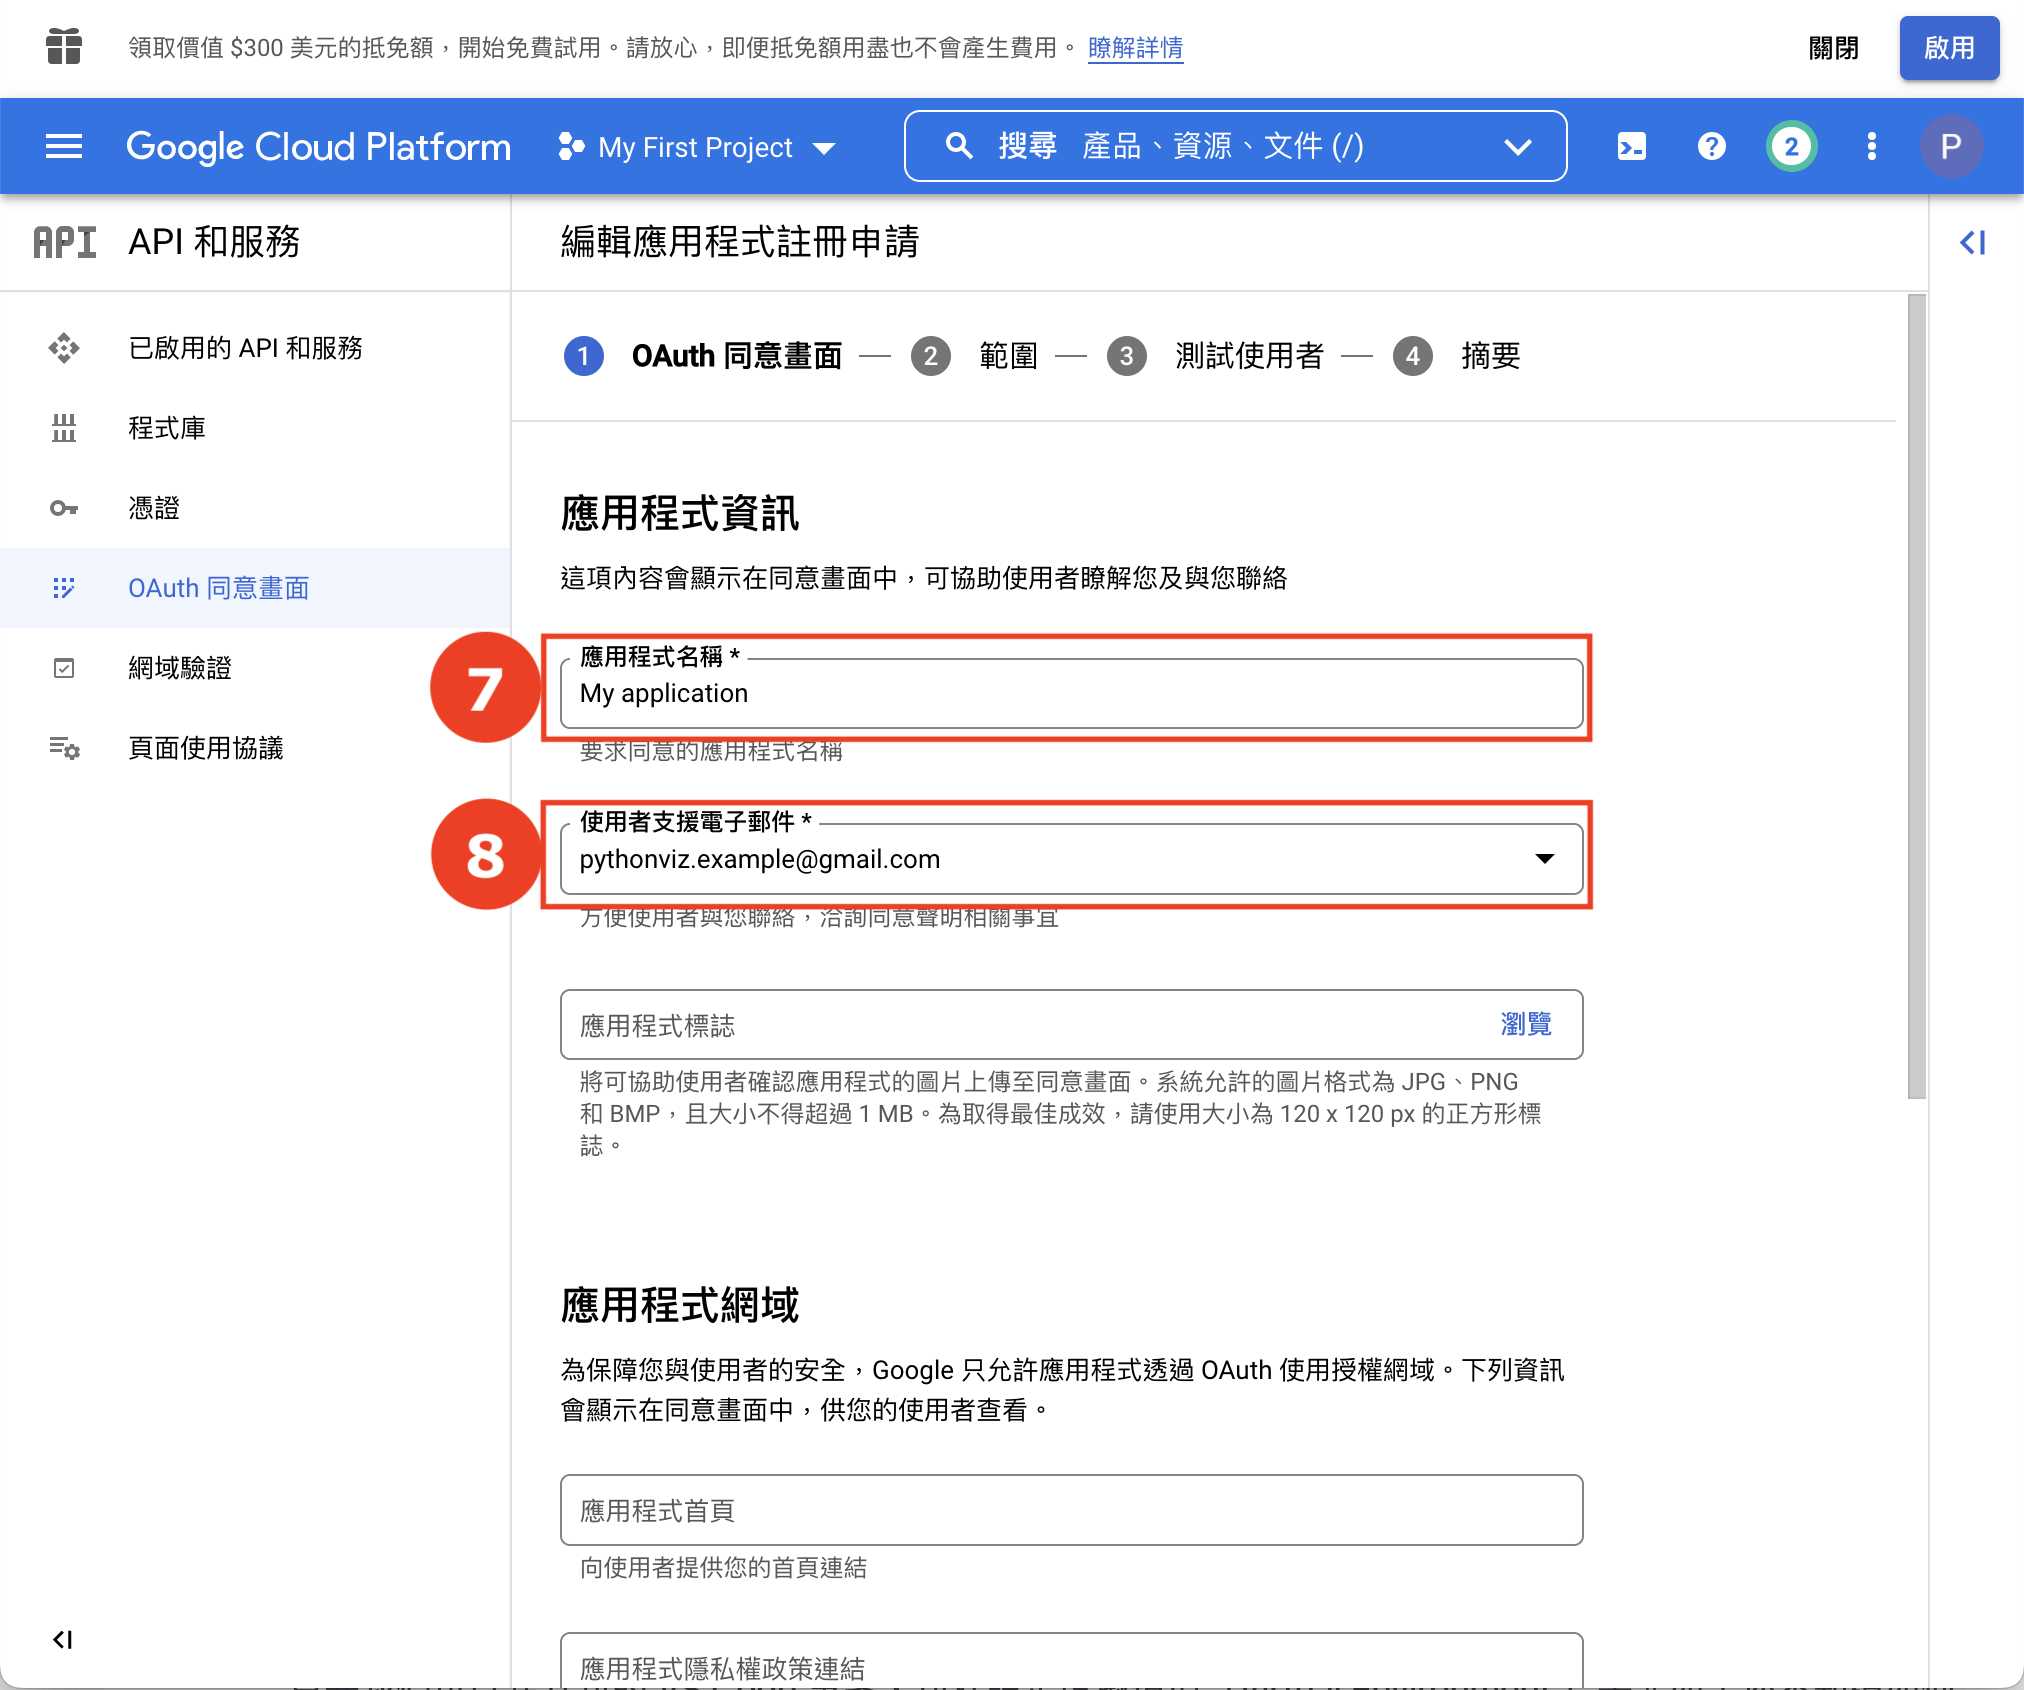
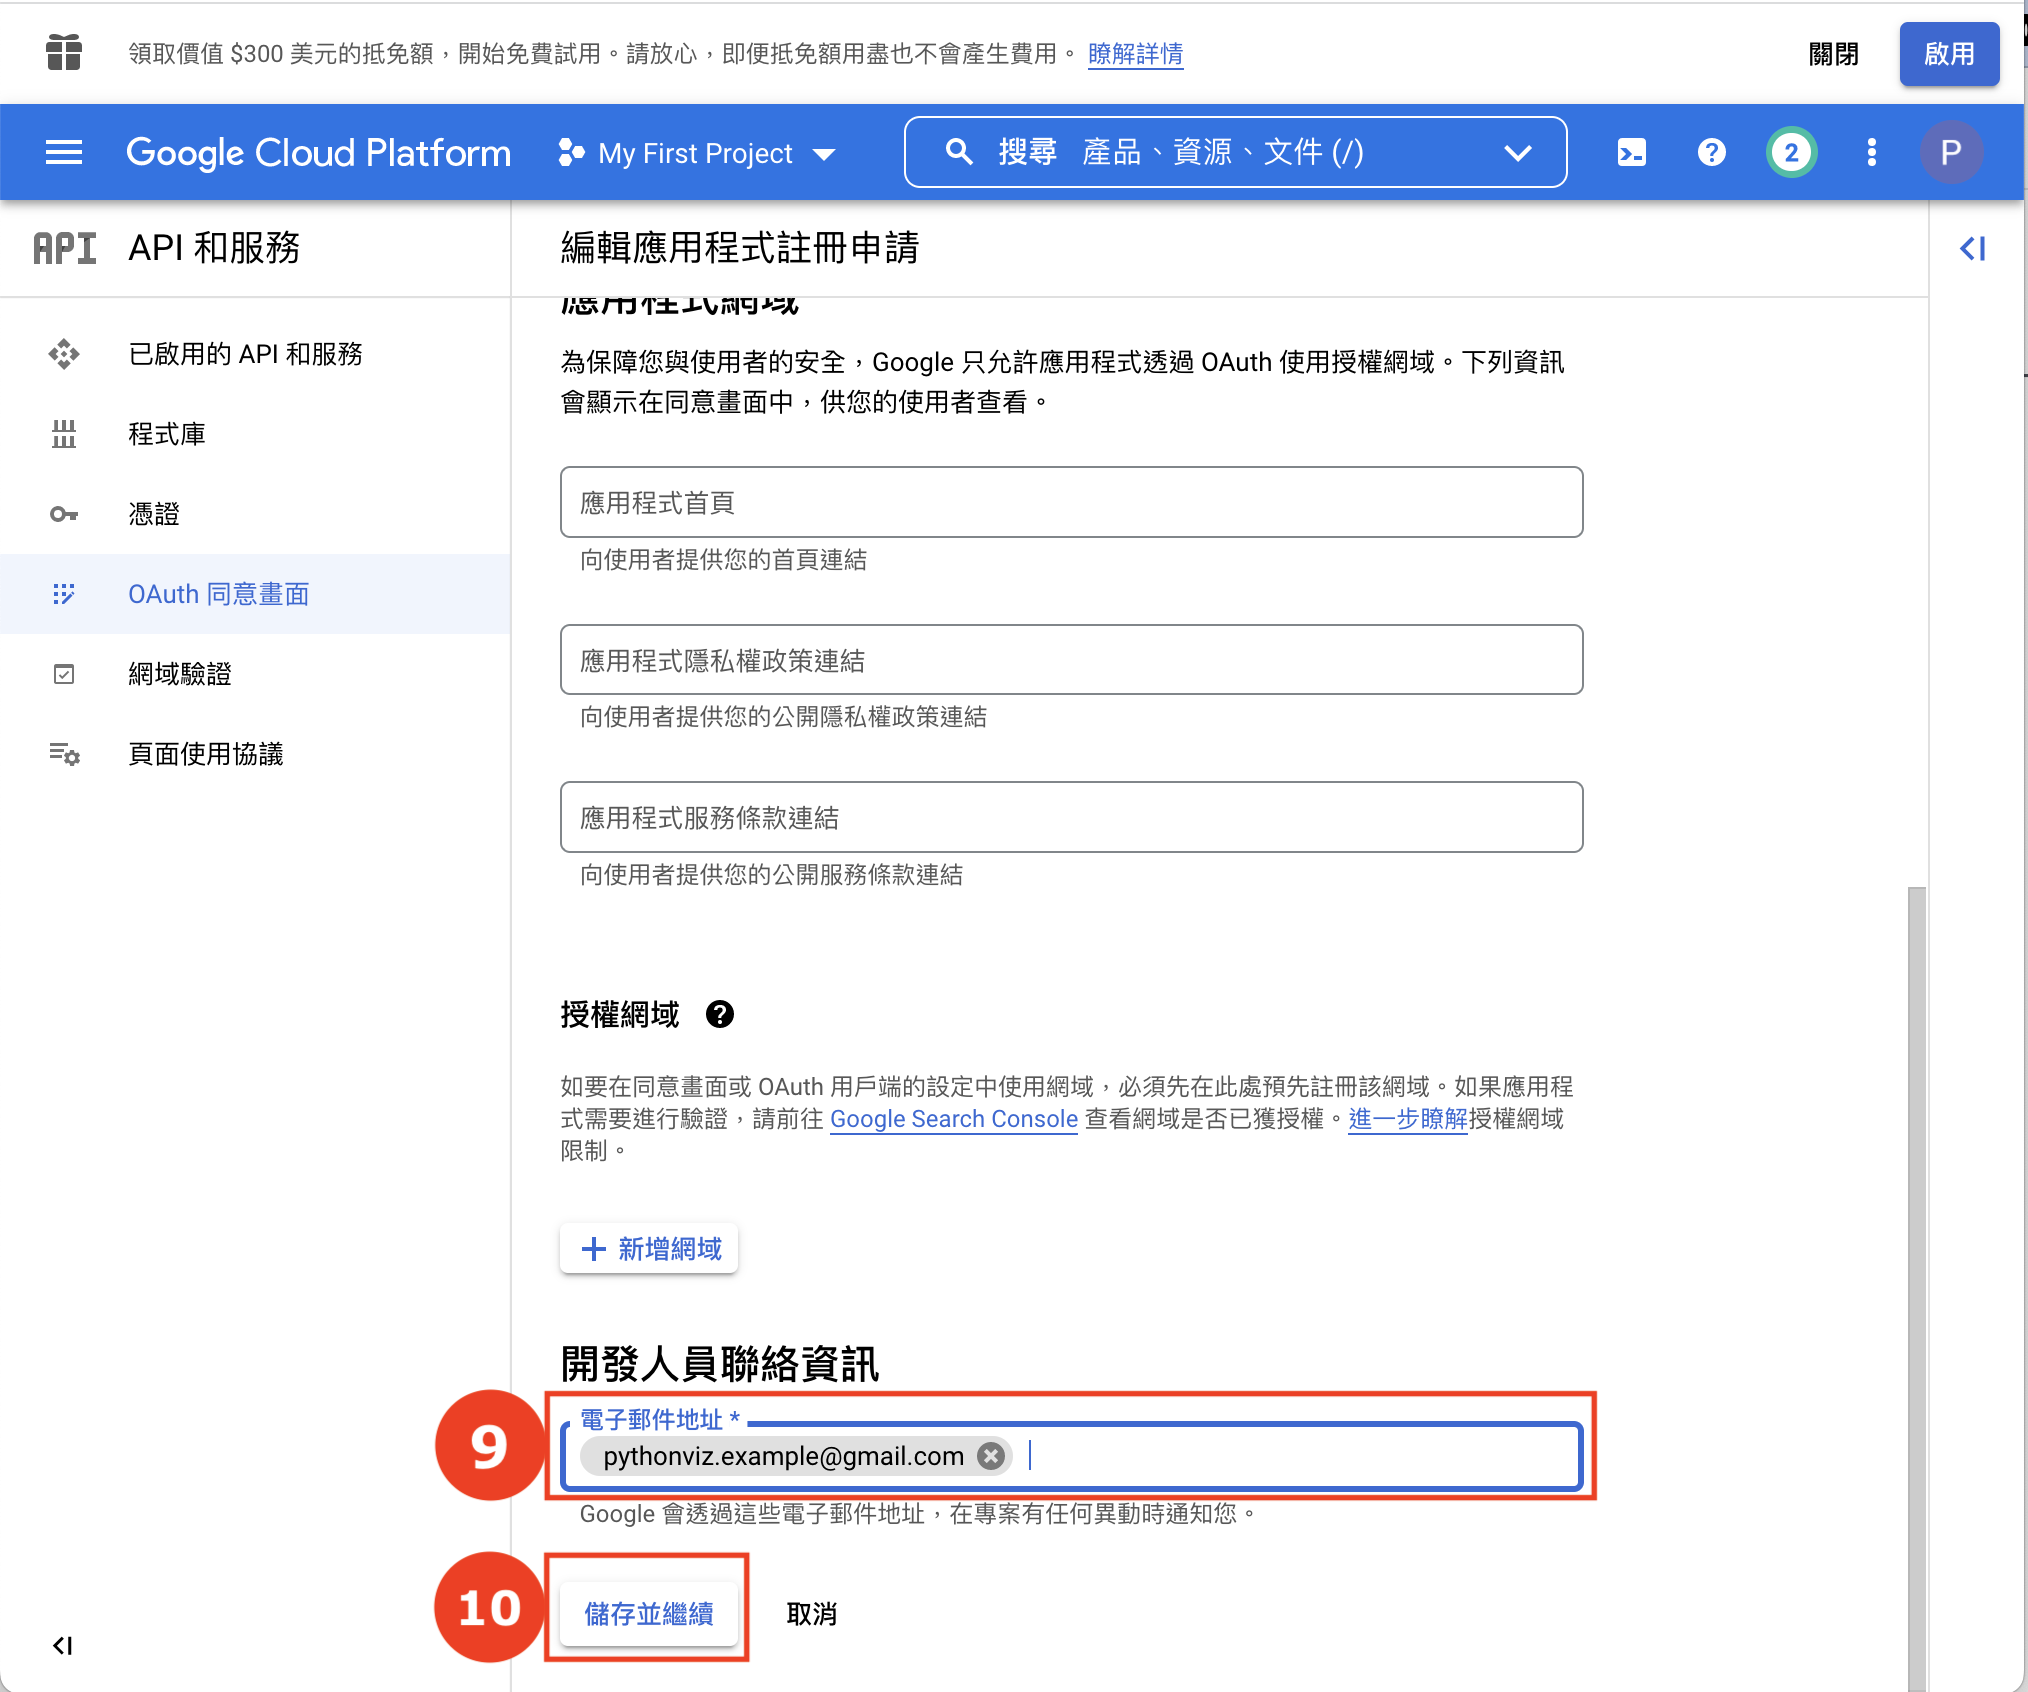
在「OAuth 同意畫面」輸入應用程式名稱、支援電郵和開發人員聯絡資料:
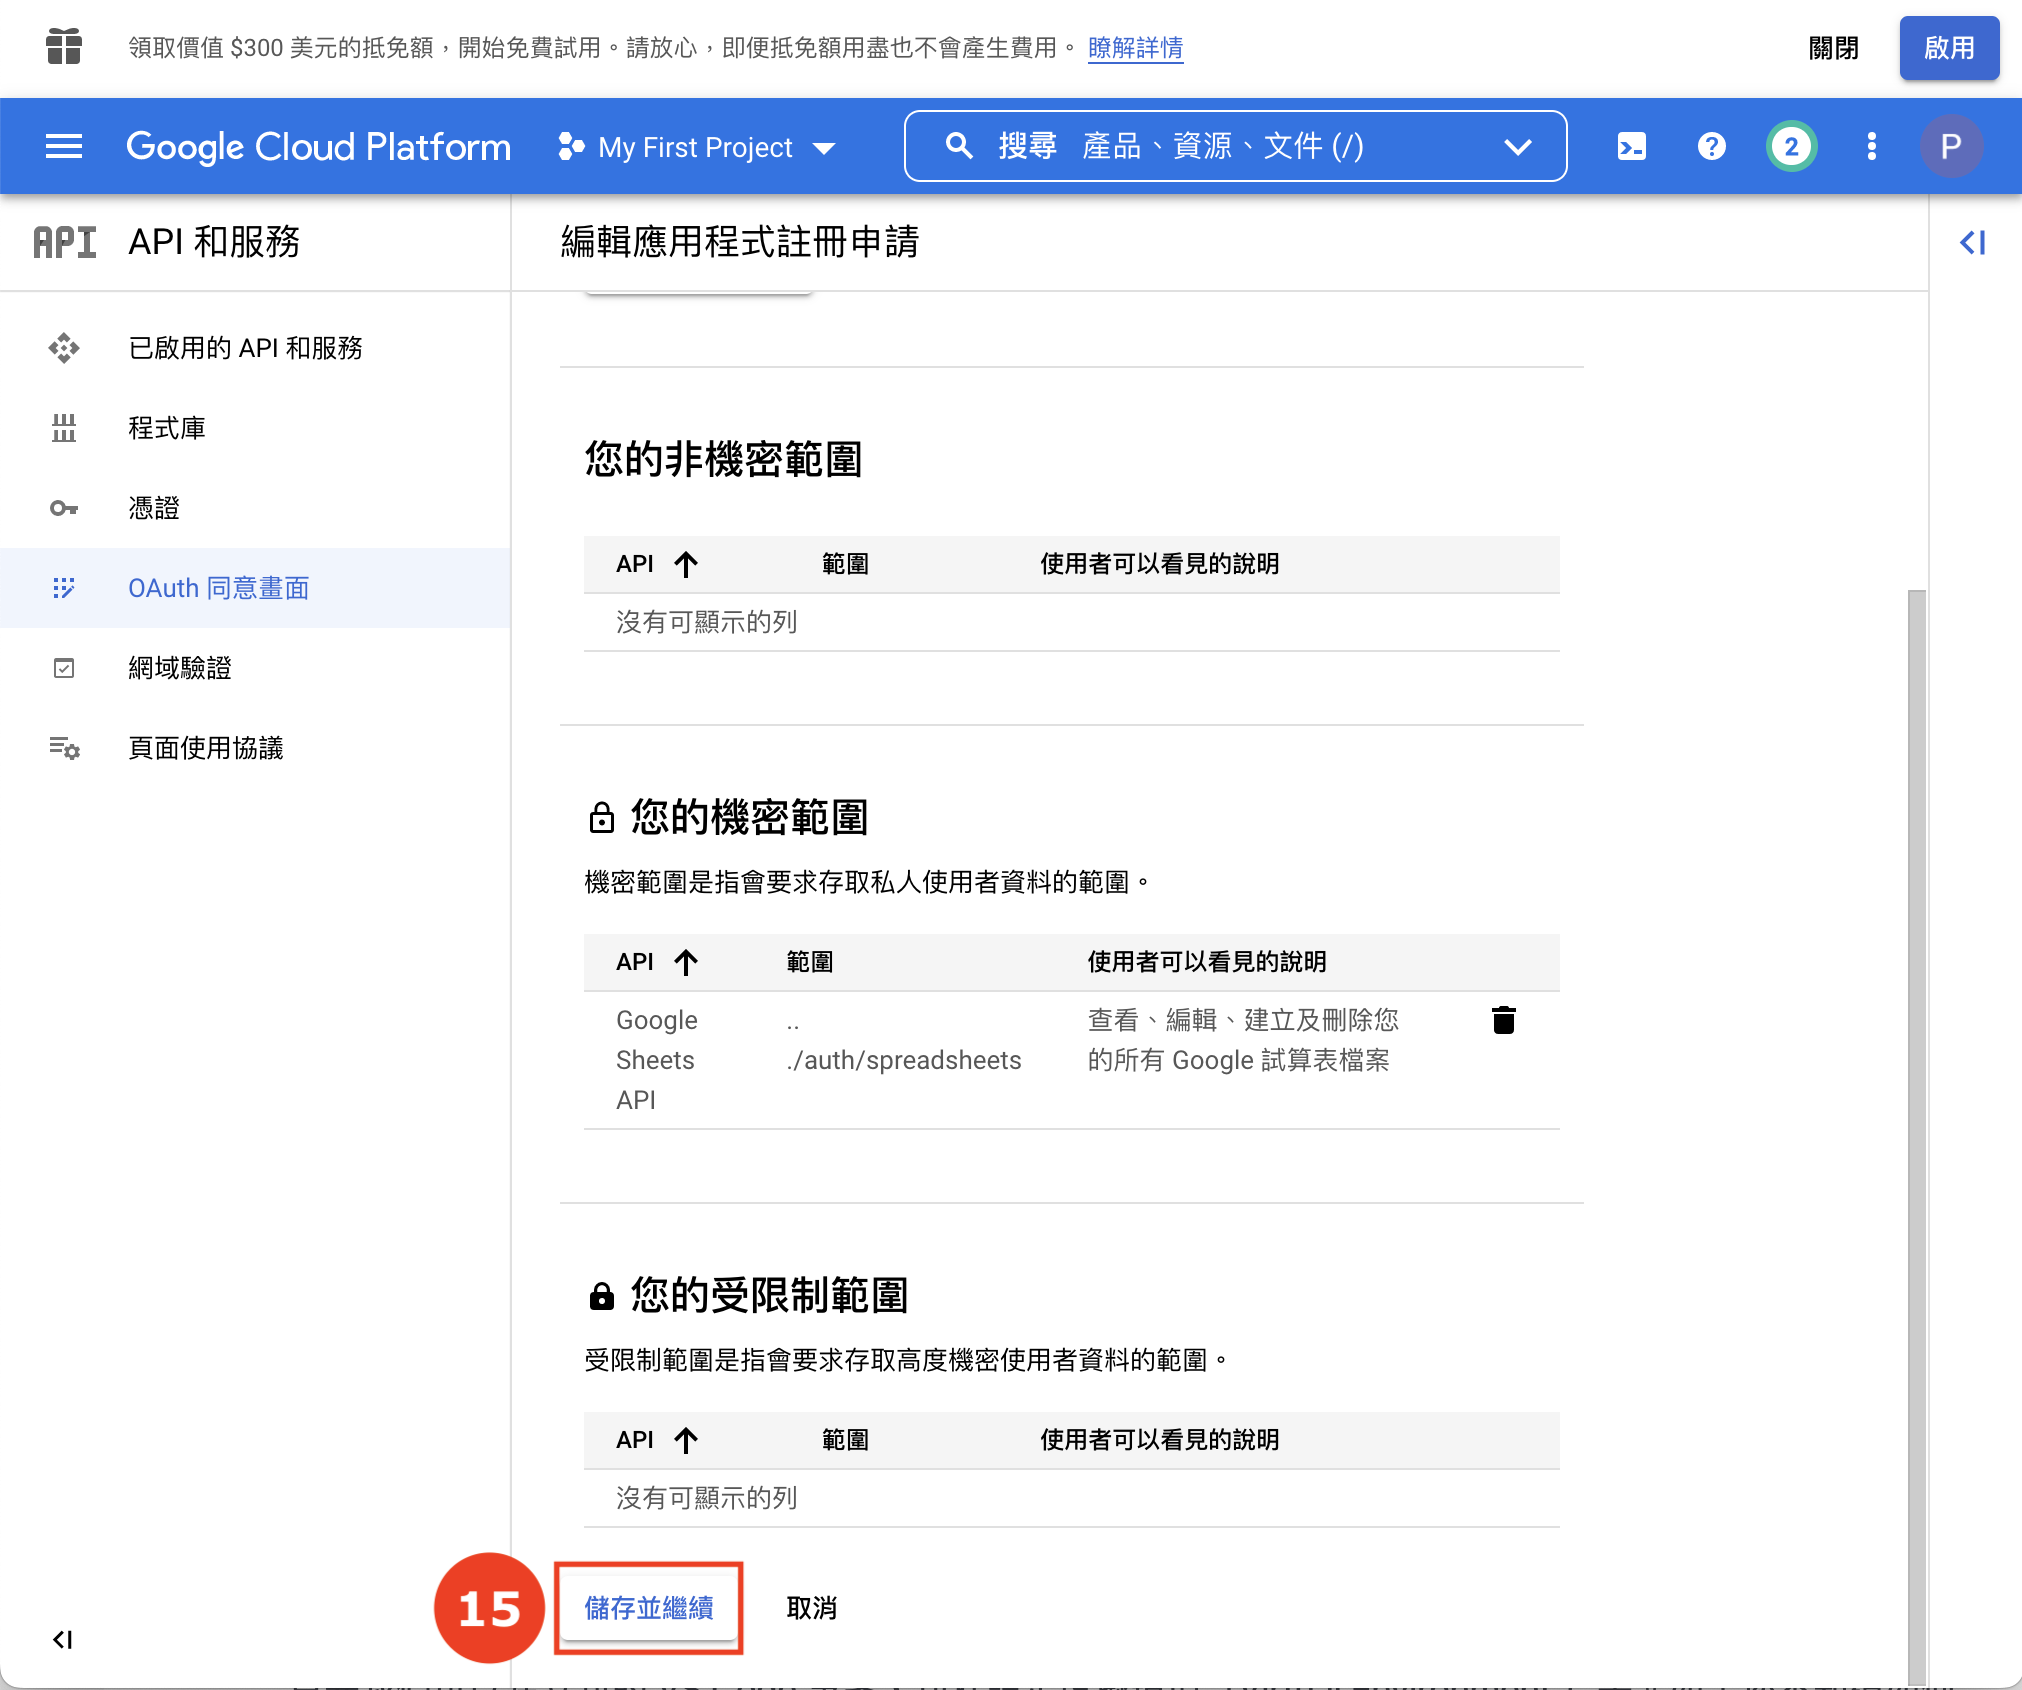
在「範圍」按一下「新增或移除範圍」,並搜尋「Google Sheets API」。選擇了「/auth/spreadsheets」後按一下更新:


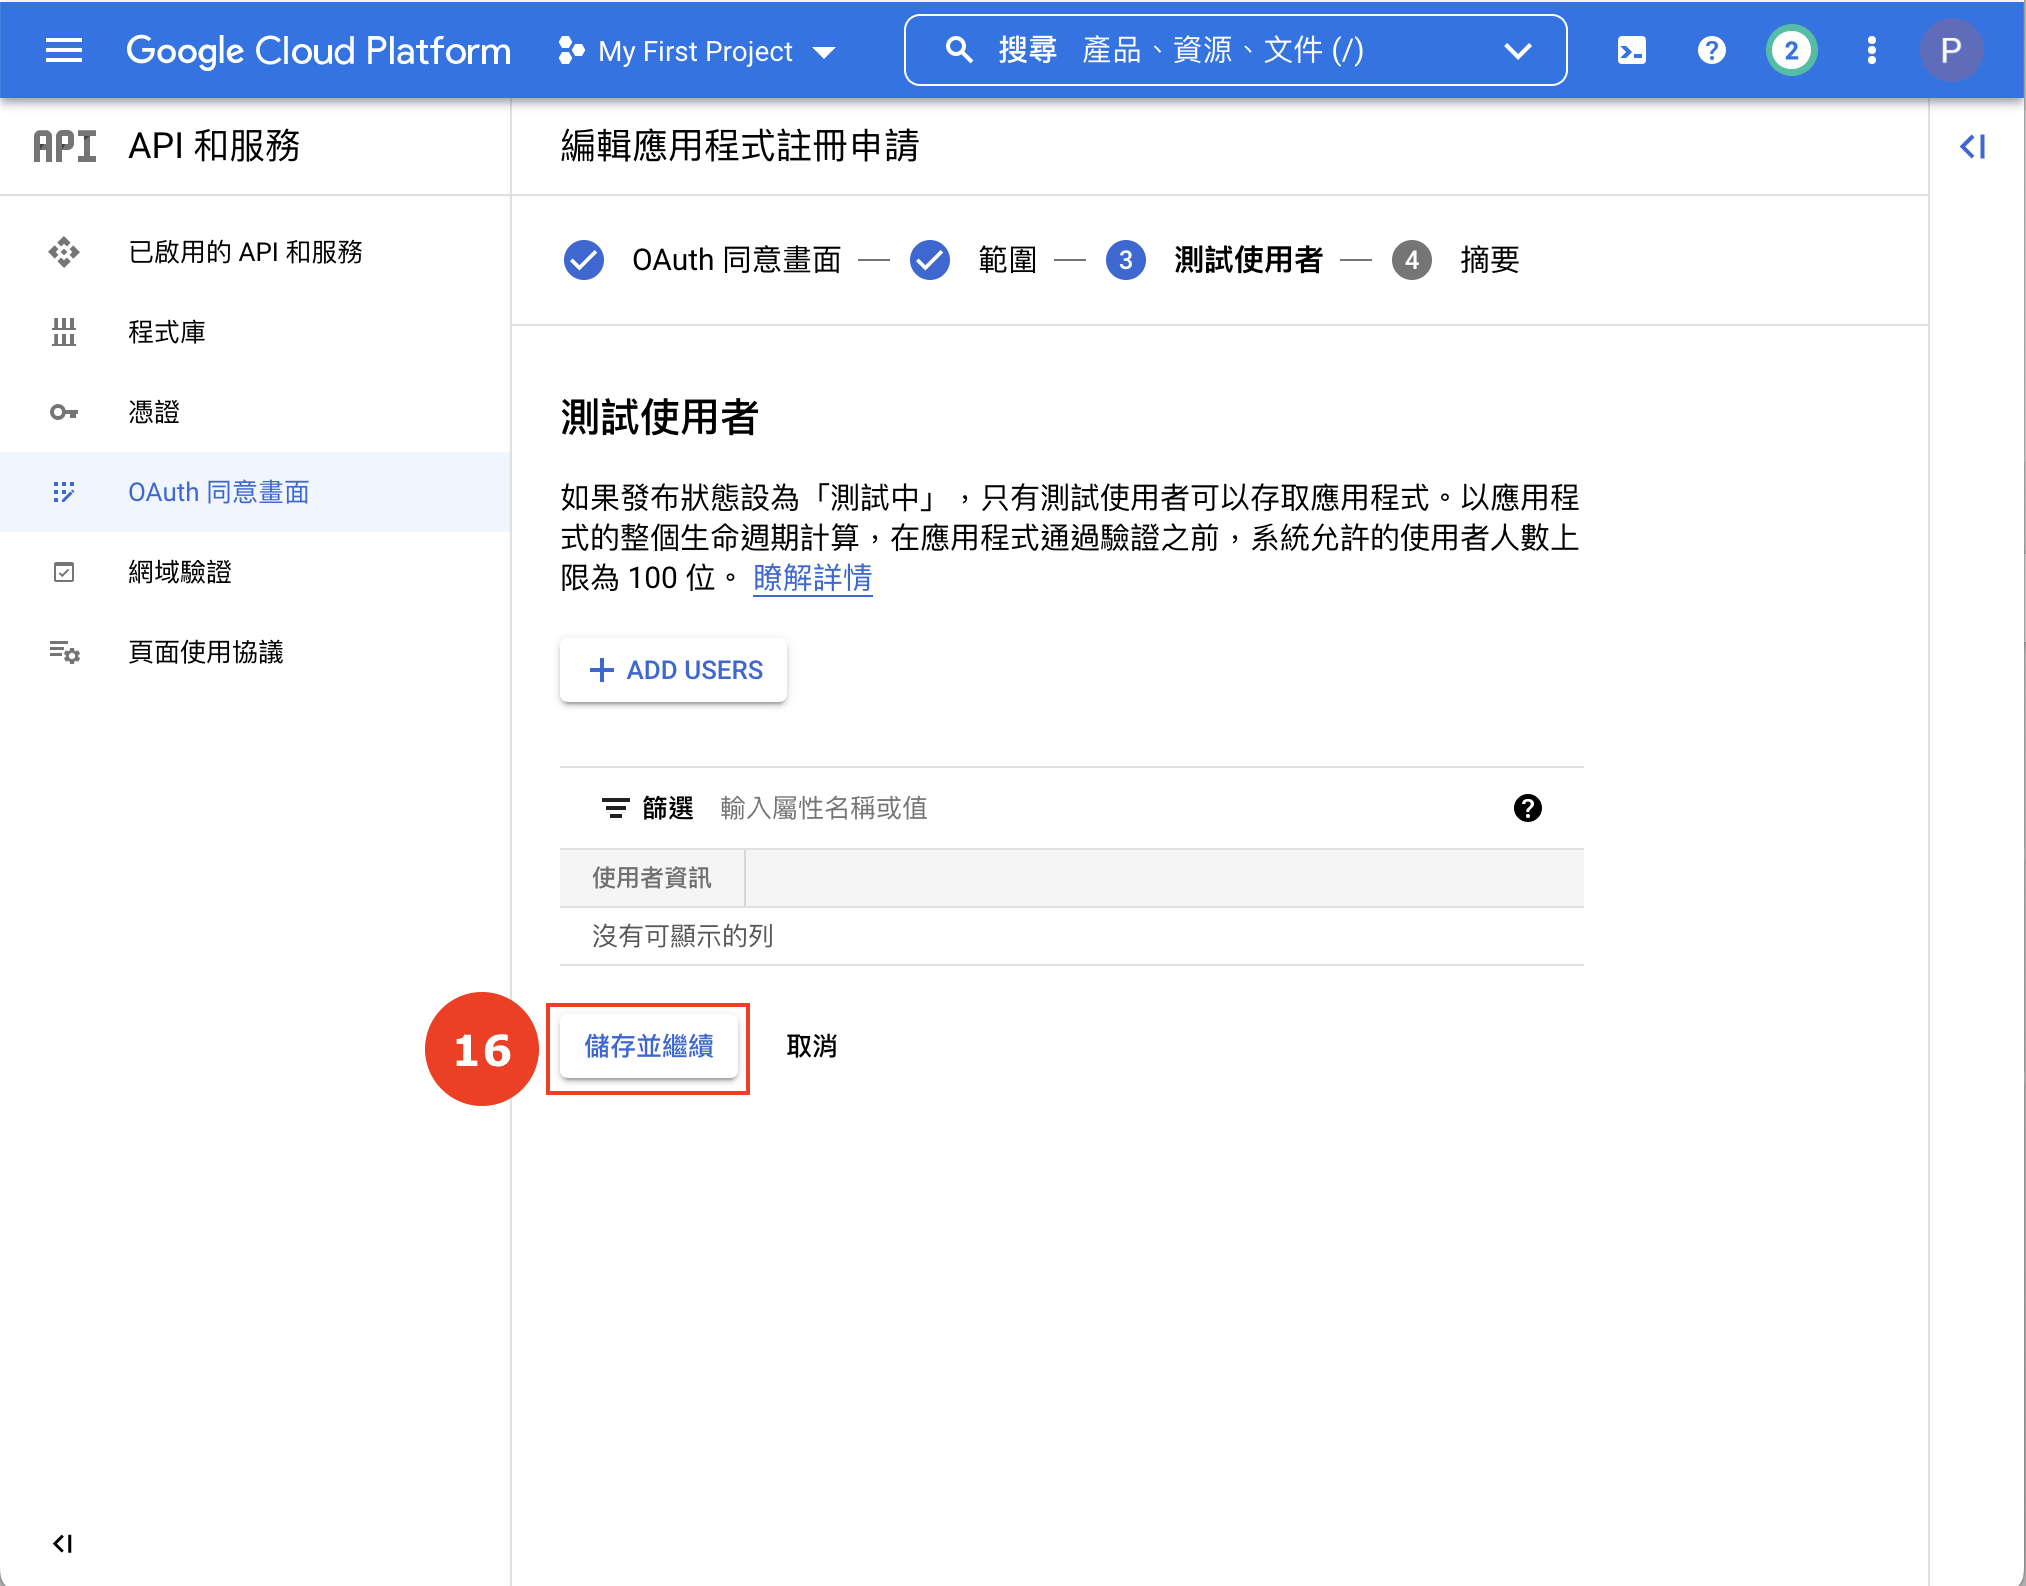
在「機密範圍」見到 Google Sheest API 後,按一下「儲存並繼續」:
再按一下「儲存並繼續」:
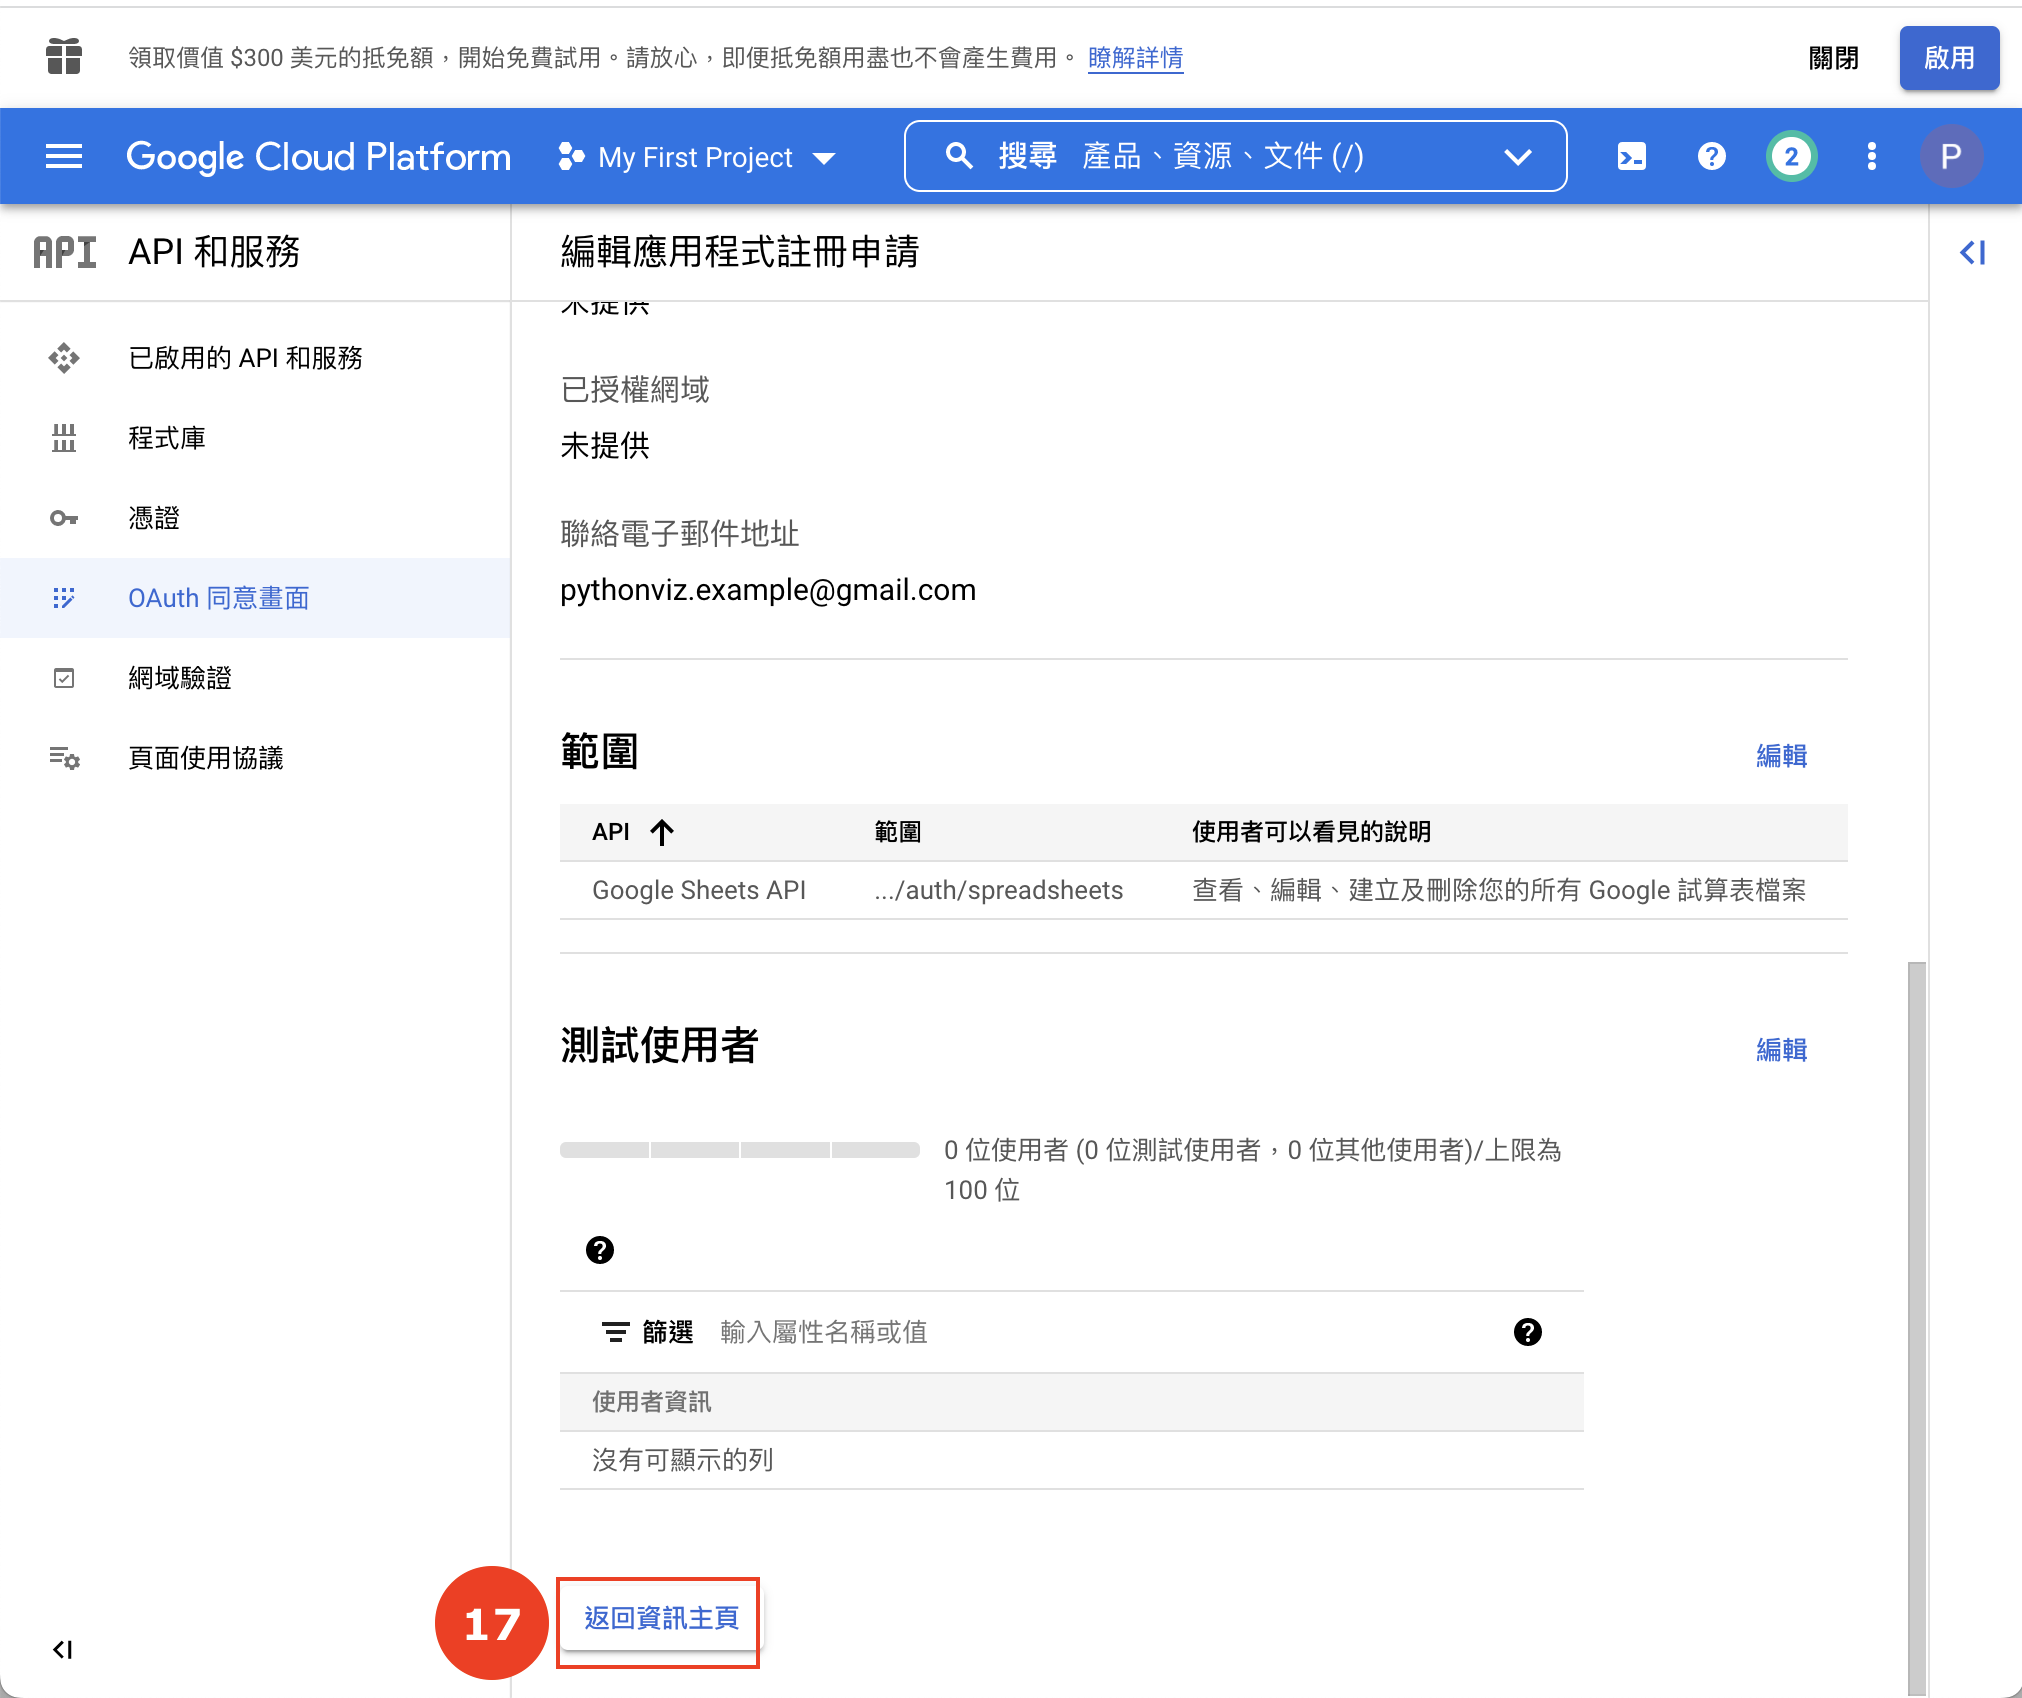
按一下「返回資訊主頁」:
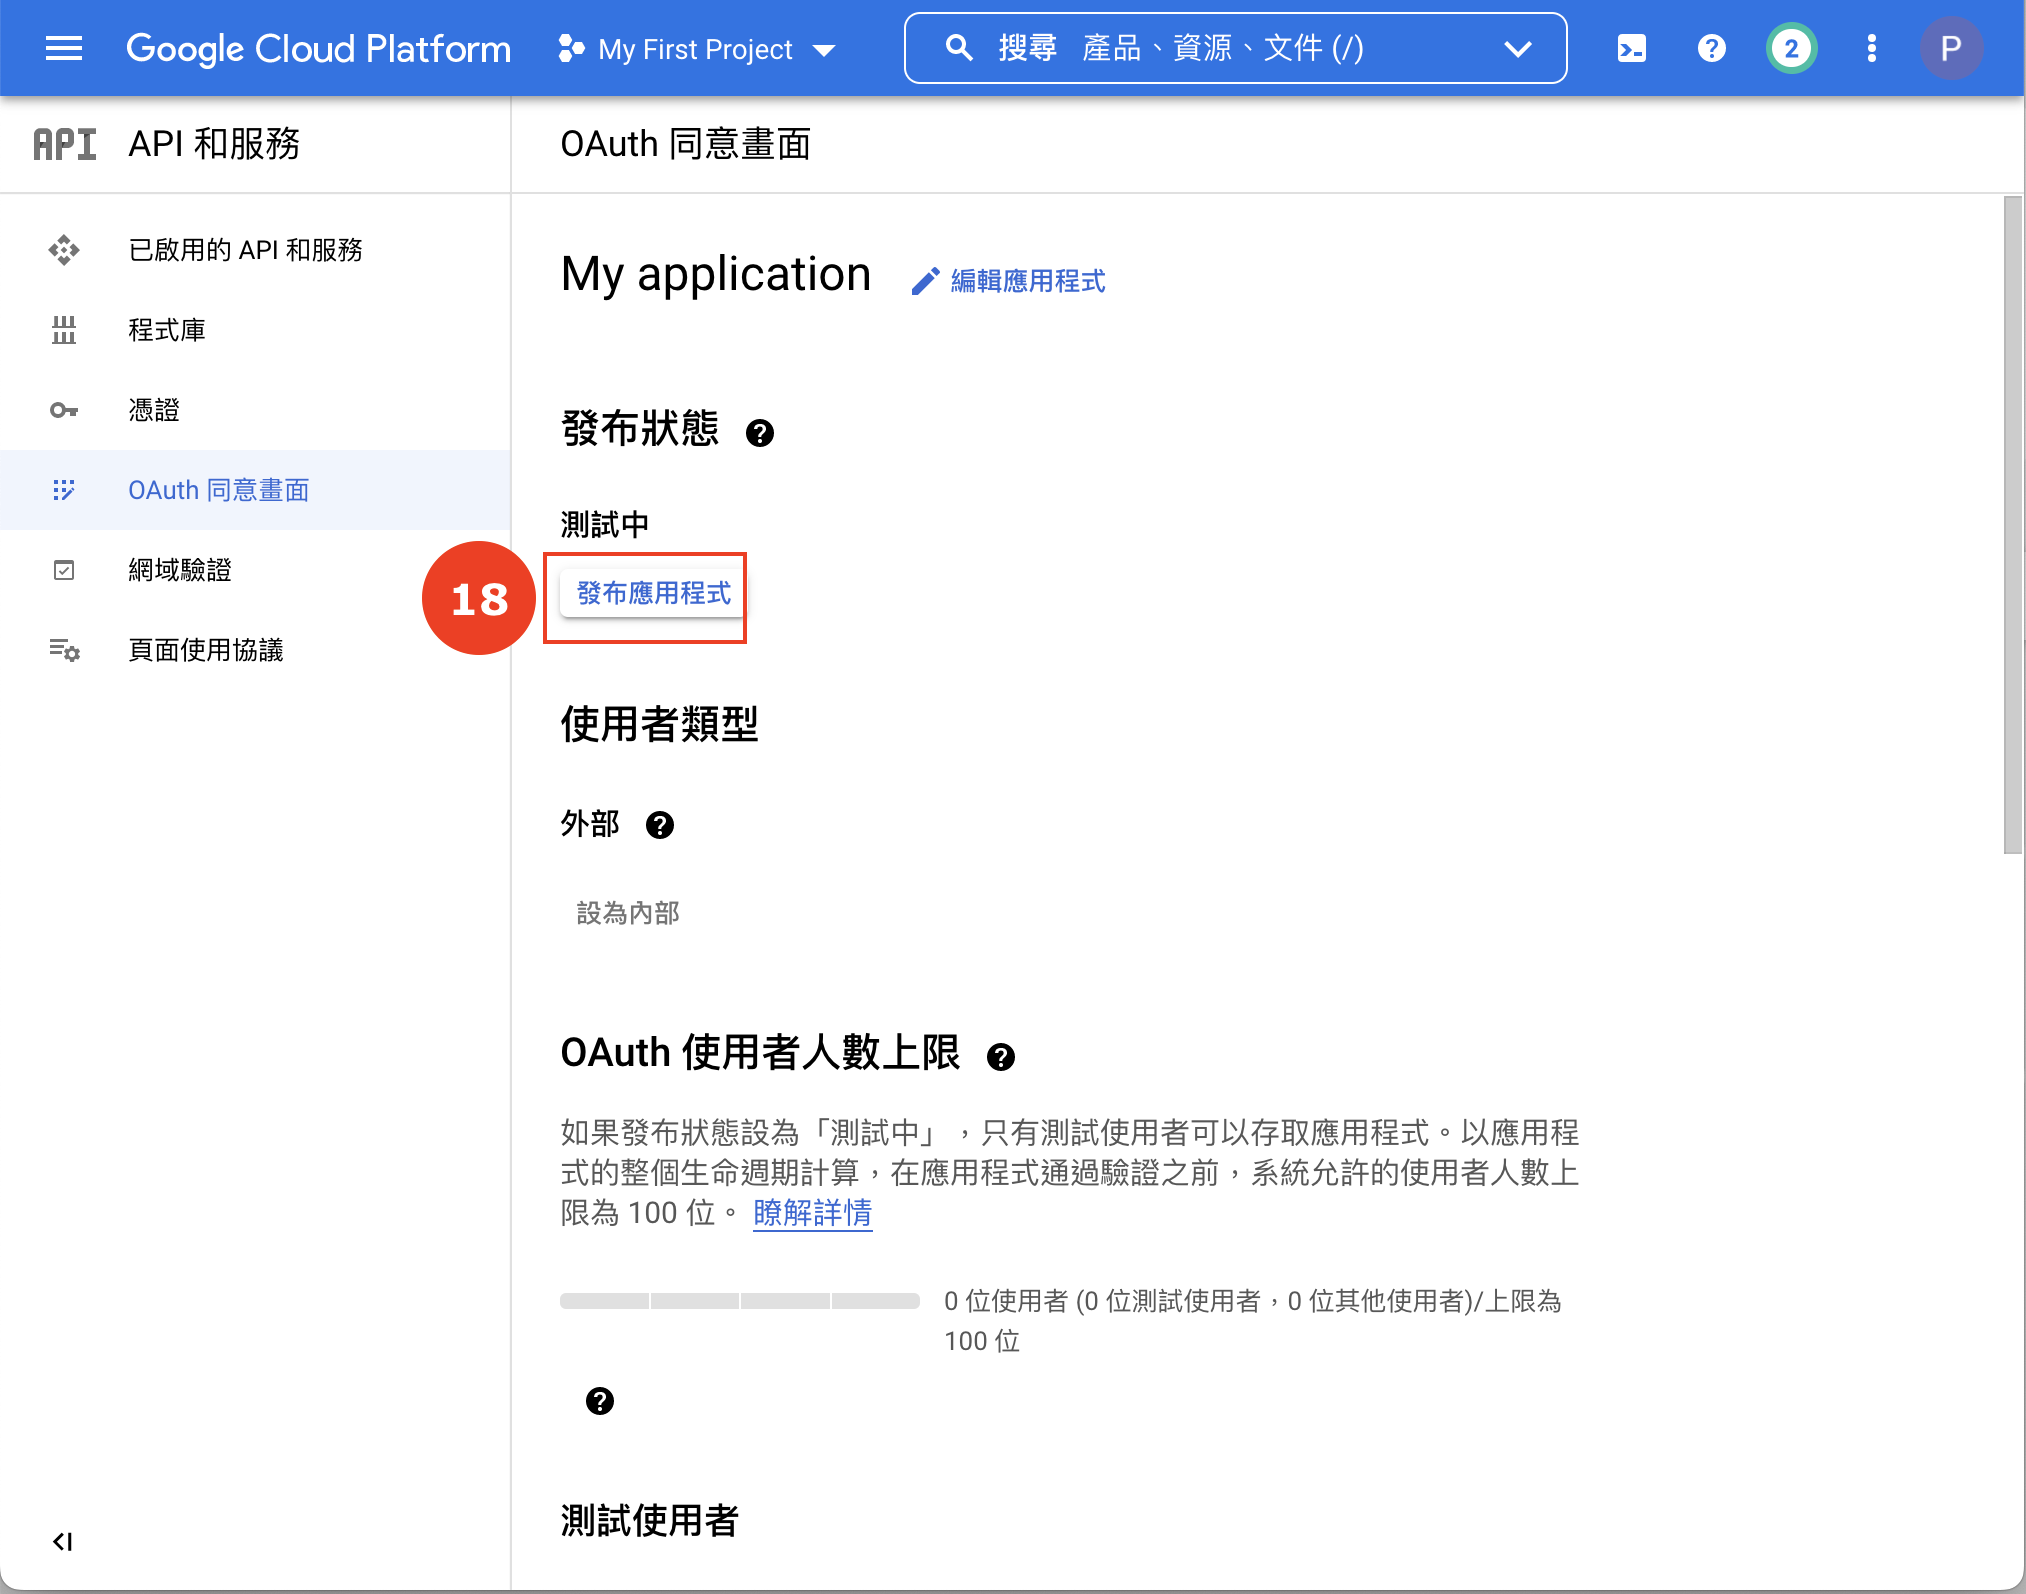
回到總結頁面,按一下「發布應用程式」:
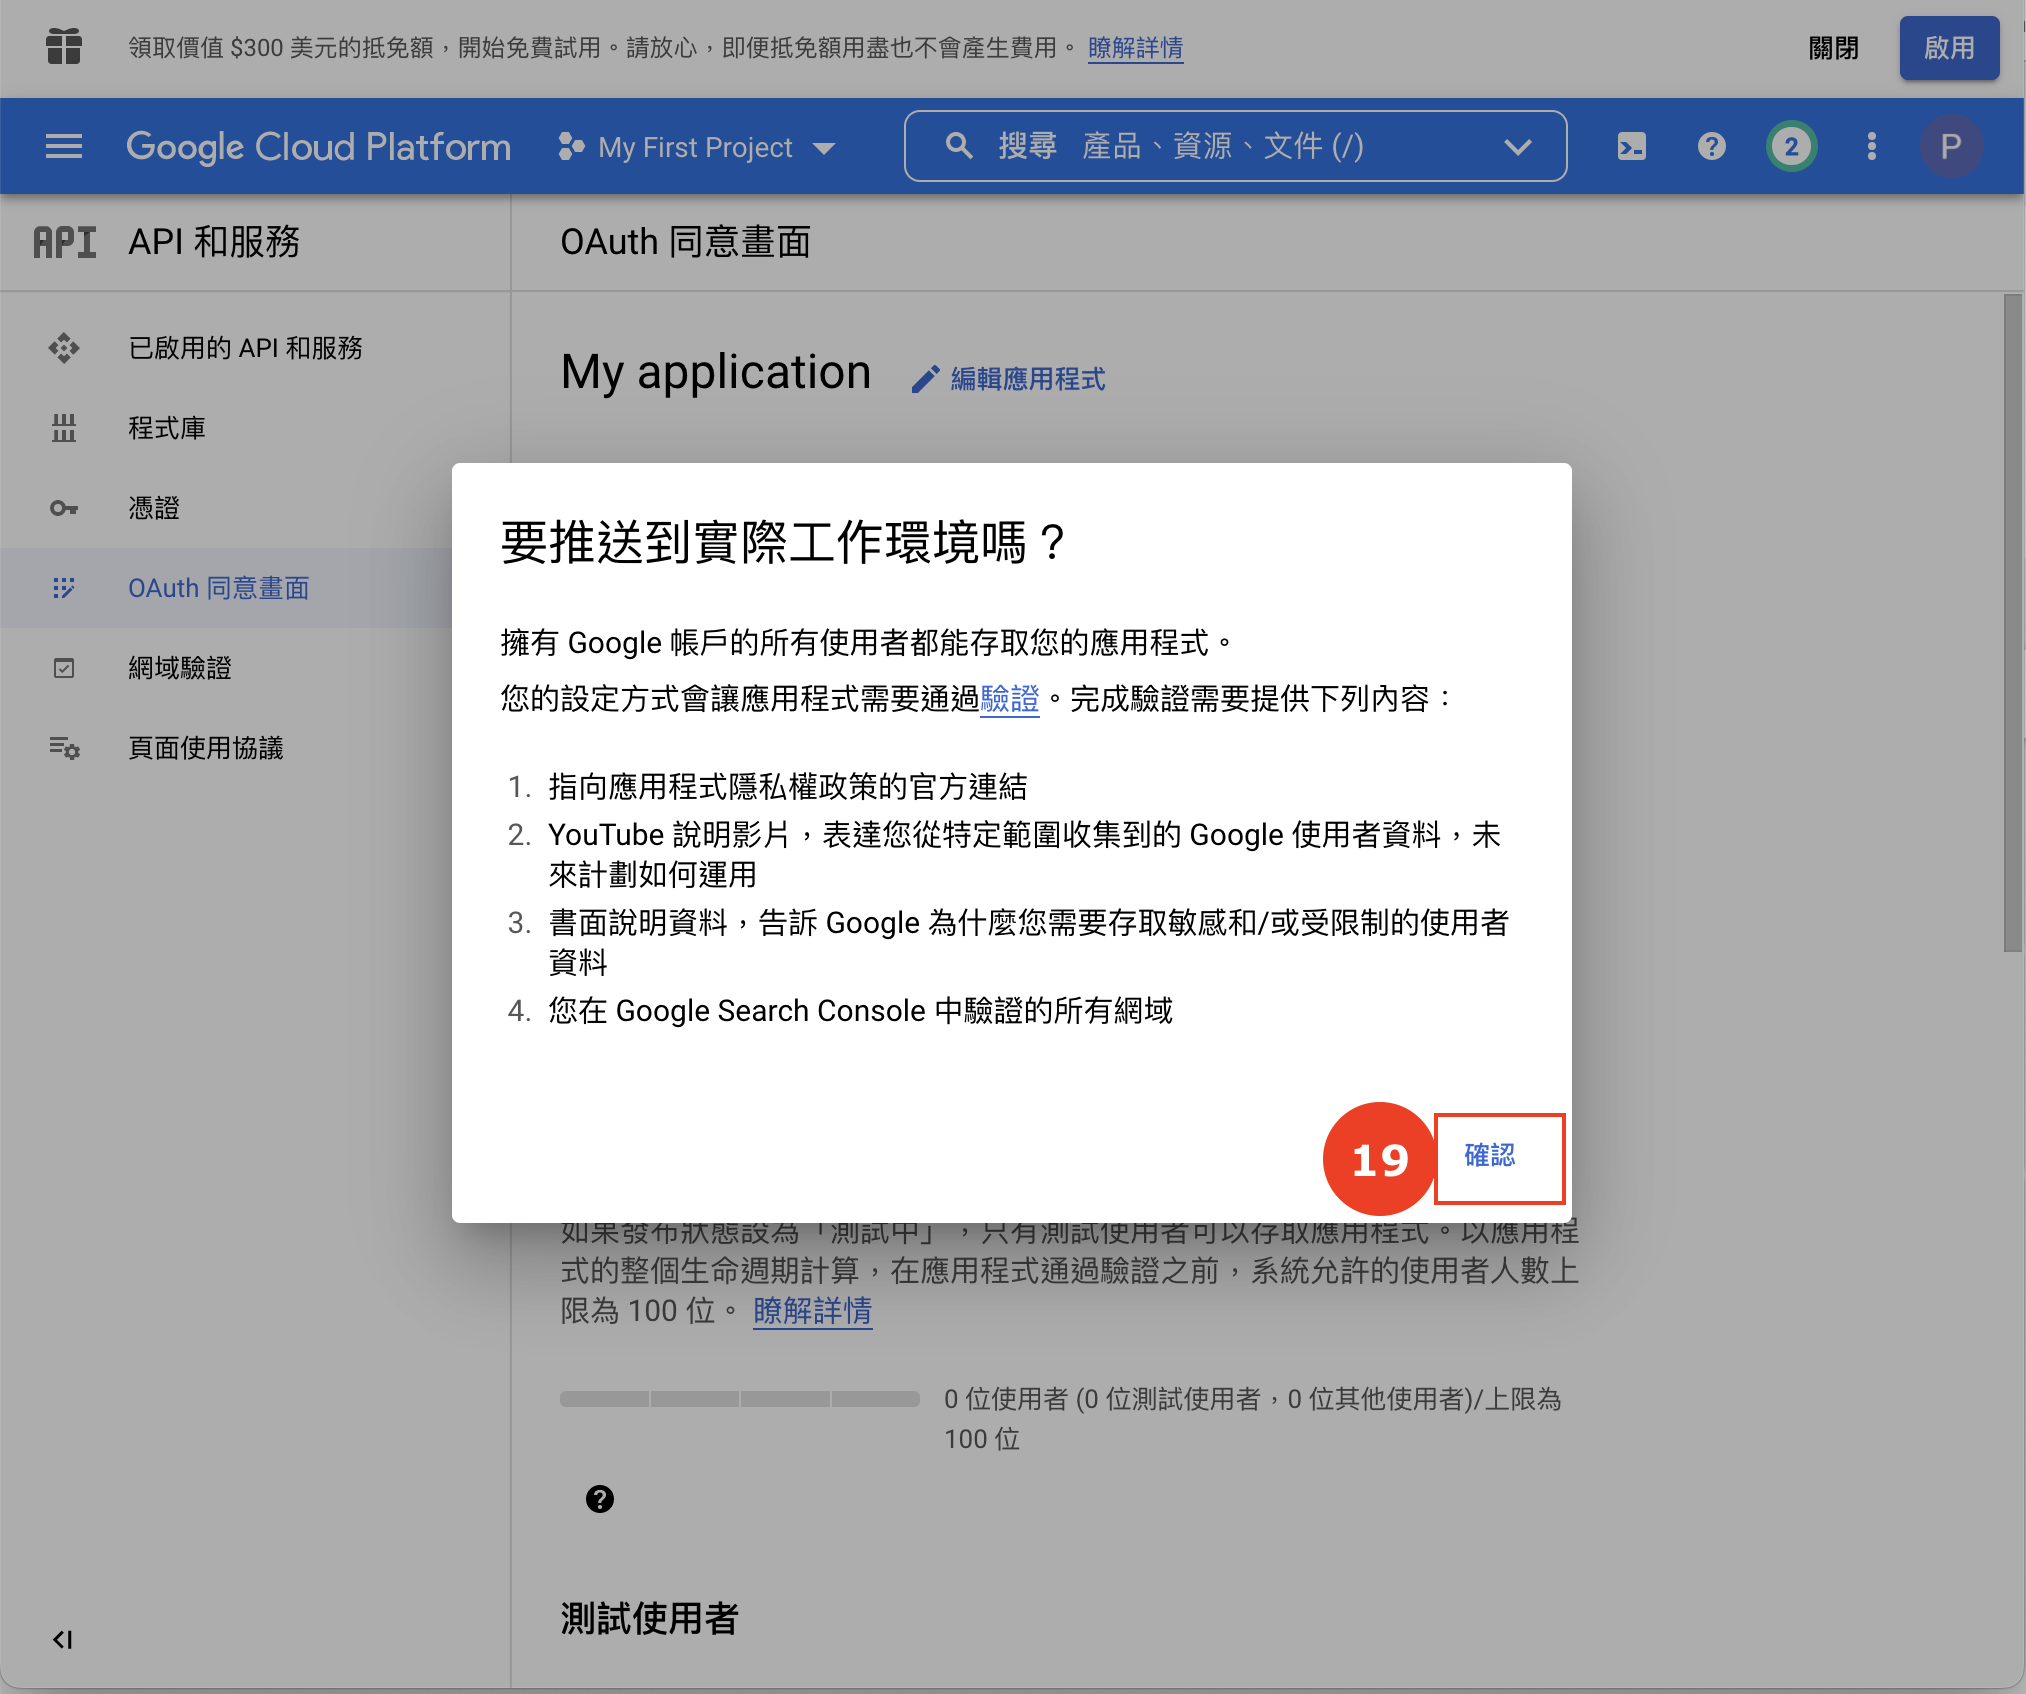
按一下「確認」:
第 3 步:獲取 OAuth 的 用戶端 ID
設定了我們的 OAuth 認證後,我們需要下載一個名為「client_secret.json」的檔案。這個檔案讓我們的 Python 專案告訴 Google 我們該使用哪一個 OAuth 認證,從而讓我們的 Python 專案獲得存取 Google Sheets 的權限。
這個檔案十分重要,記得好好保存和不要與別人分享!
首先我們到左邊選擇「憑證」,在應用程式類型選擇「電腦版應用程式」。輸入名稱後到最底按一下「建立」:


完成後,我們會見到一個彈出「OAuth 用戶端已建立」。按一下「下載 JSON」獲取我們的「client_secret.json」:

第 4 步:建立新的 VS Code 專案
完成以上步驟後,我們需要建立新的 VS Code 專案,包括設定虛擬環境(Virtual Environment )等。如果您不知道如何設定虛擬環境,可以參考以下的教學:
- VSCode 2/5: 設定虛擬環境 Virtual Env,管理 Python 專案!
- VSCode 3/5: 實戰篇!版面介紹、管理 Python 專案和多個 .py
- VSCode 4/5: 讓 pip 安裝和管理 Python Libraries,結合虛擬環境!
我們假設您已經在新的 VS Code 專案建立了新的虛擬環境(Virtual Environment)。以下我們會參考 Google Sheets API 的官方教學,並稍作更改。
首先我們使用 pip 安裝官方版本的 Google API Python Client(按這裡學習使用 pip):

pip install --upgrade google-api-python-client google-auth-httplib2 google-auth-oauthlib
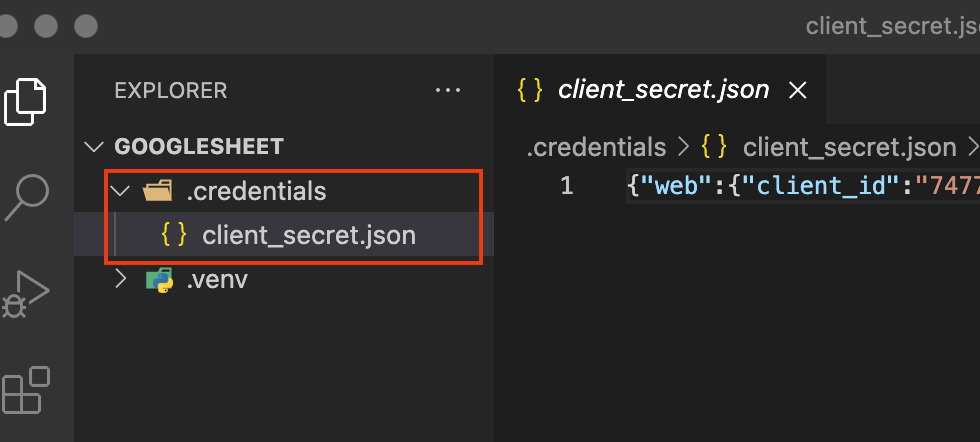
完成後,我們在專案建立一個名叫「.credentials」的文件夾,然後把剛才下載的「client_secret.json」命名後加入新的文件夾:
第 5 步:建立 Google API 服務
有了以上的設置後,我們終於可以在 Python 存取 Google API 的服務了!
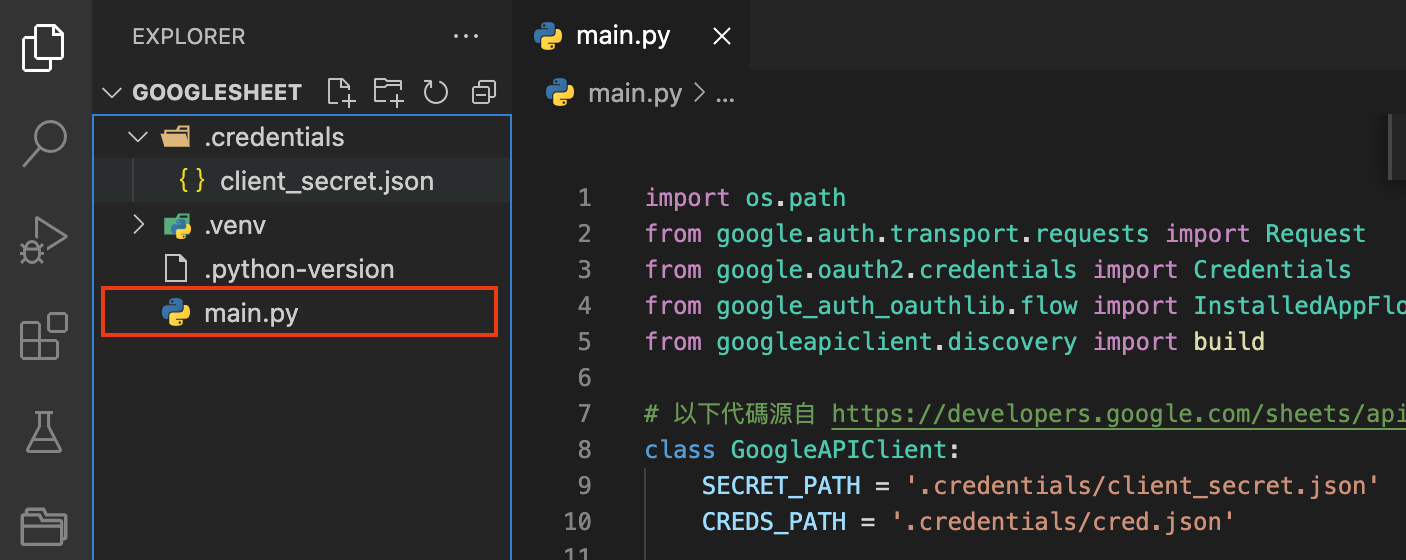
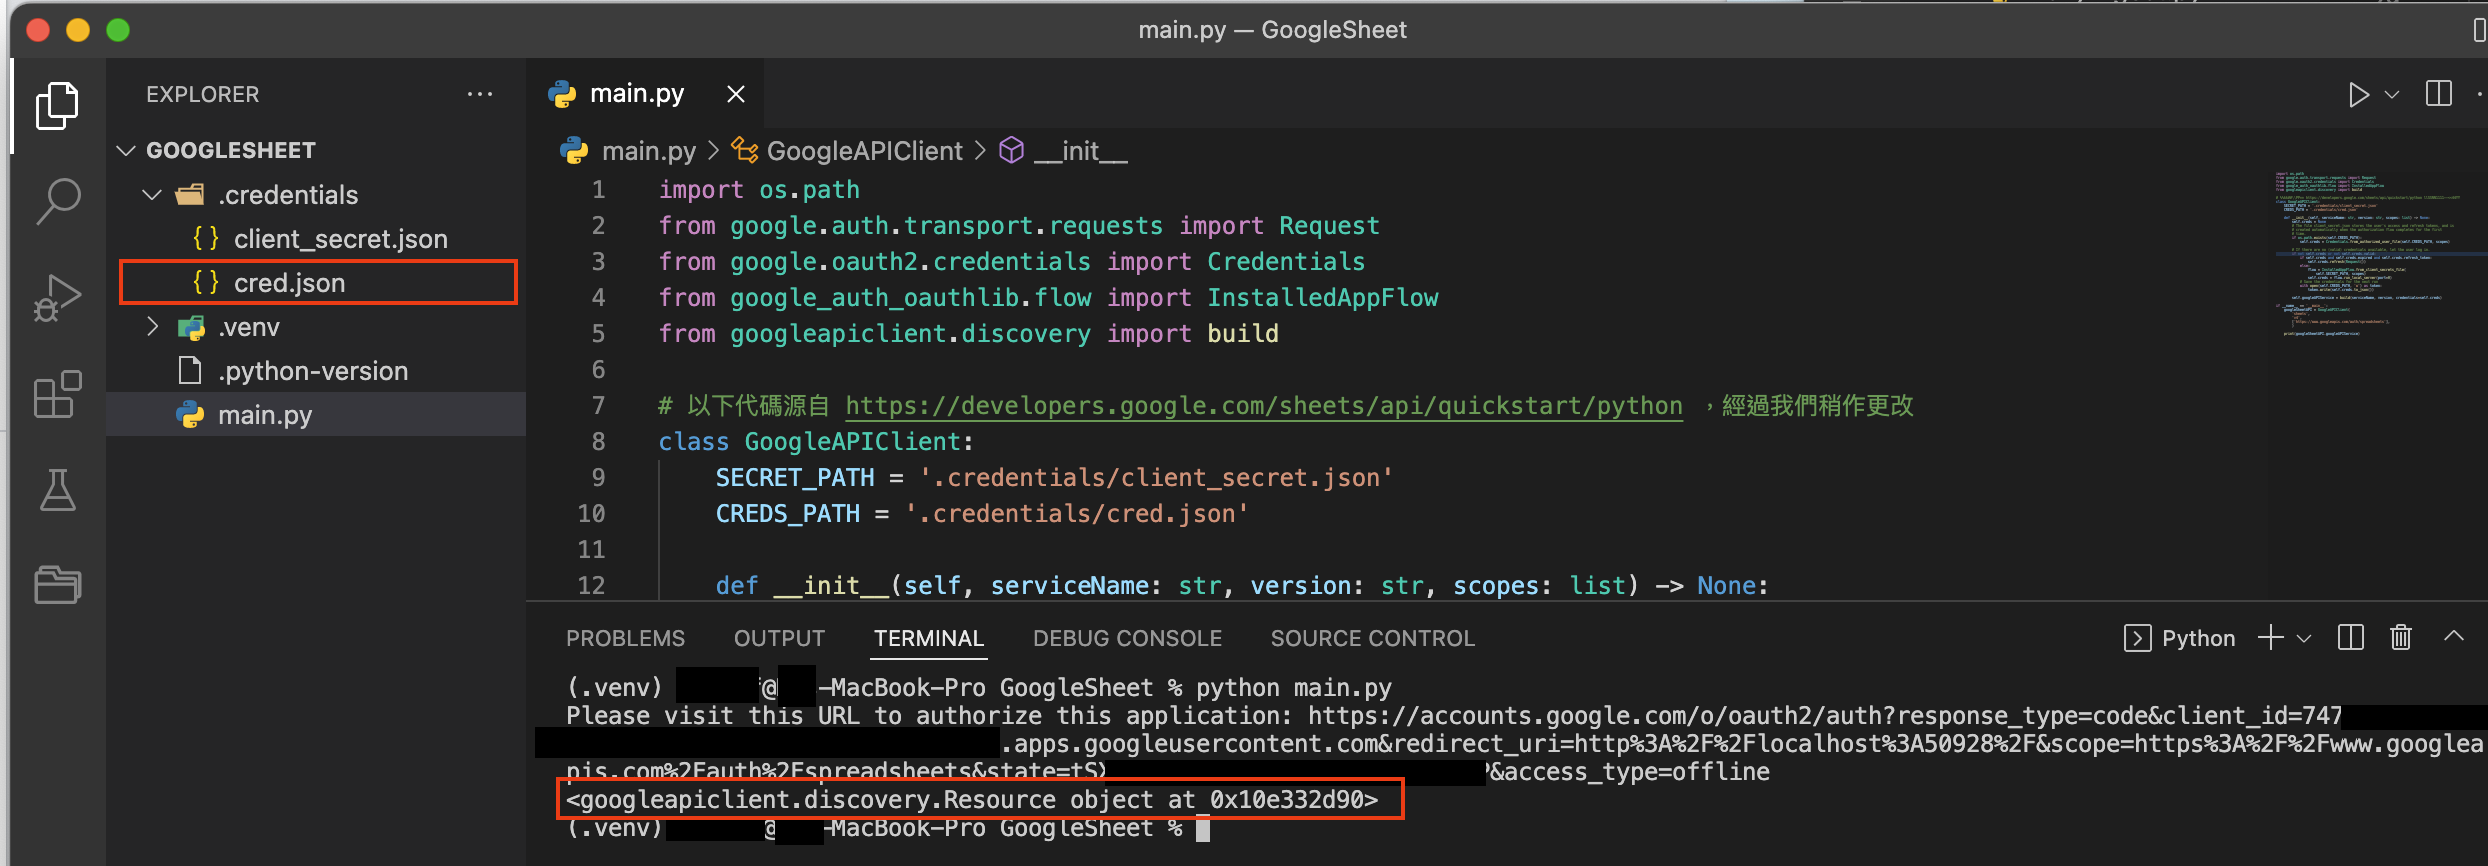
我們在專案建立一個 main.py 的檔案,並把一下的 Python 編碼複製貼上:
import os.path
from google.auth.transport.requests import Request
from google.oauth2.credentials import Credentials
from google_auth_oauthlib.flow import InstalledAppFlow
from googleapiclient.discovery import build

# 以下代碼源自 https://developers.google.com/sheets/api/quickstart/python ,經過我們稍作更改
class GoogleAPIClient:
    SECRET_PATH = '.credentials/client_secret.json'
    CREDS_PATH = '.credentials/cred.json'

    def __init__(self, serviceName: str, version: str, scopes: list) -> None:
        self.creds = None
        # The file client_secret.json stores the user's access and refresh tokens, and is
        # created automatically when the authorization flow completes for the first
        # time.
        if os.path.exists(self.CREDS_PATH):
            self.creds = Credentials.from_authorized_user_file(self.CREDS_PATH, scopes)

        # If there are no (valid) credentials available, let the user log in.
        if not self.creds or not self.creds.valid:
            if self.creds and self.creds.expired and self.creds.refresh_token:
                self.creds.refresh(Request())
            else:
                flow = InstalledAppFlow.from_client_secrets_file(
                    self.SECRET_PATH, scopes)
                self.creds = flow.run_local_server(port=0)
            # Save the credentials for the next run
            with open(self.CREDS_PATH, 'w') as token:
                token.write(self.creds.to_json())

        self.googleAPIService = build(serviceName, version, credentials=self.creds)

if __name__ == '__main__':
    googleSheetAPI = GoogleAPIClient(
        'sheets',
        'v4',
        ['https://www.googleapis.com/auth/spreadsheets'],
        )

    print(googleSheetAPI.googleAPIService)
我們先來解釋一下這段 Python 編碼在做什麼。
這裡我們定義了一個名為 GoogleAPIClient 的物件(class/object),而我們的最終目的是 GoogleAPIClient 裡的 googleAPIService 函數。
這個 googleAPIService 函數就像我們的鑰匙一樣,讓我們可以通過呼喚這個函數的功能去存取我們的 Google 服務,例如獲取 Google Sheets 裡的試算表數據等。
而在 GoogleAPIClient 的初啟功能(__init__)裡,我們的目的是讓用戶(我們自己)可以透過登入自己的 Google 帳戶,授權我們的 Python 應用程式去存取 Google 帳戶的數據。
用戶登入後,我們會把他們的授權(credentials)儲存下來,讓我們下次可以直接使用同一個授權,而不用用戶再次登入。
GoogleAPIClient 有 3 個函數:
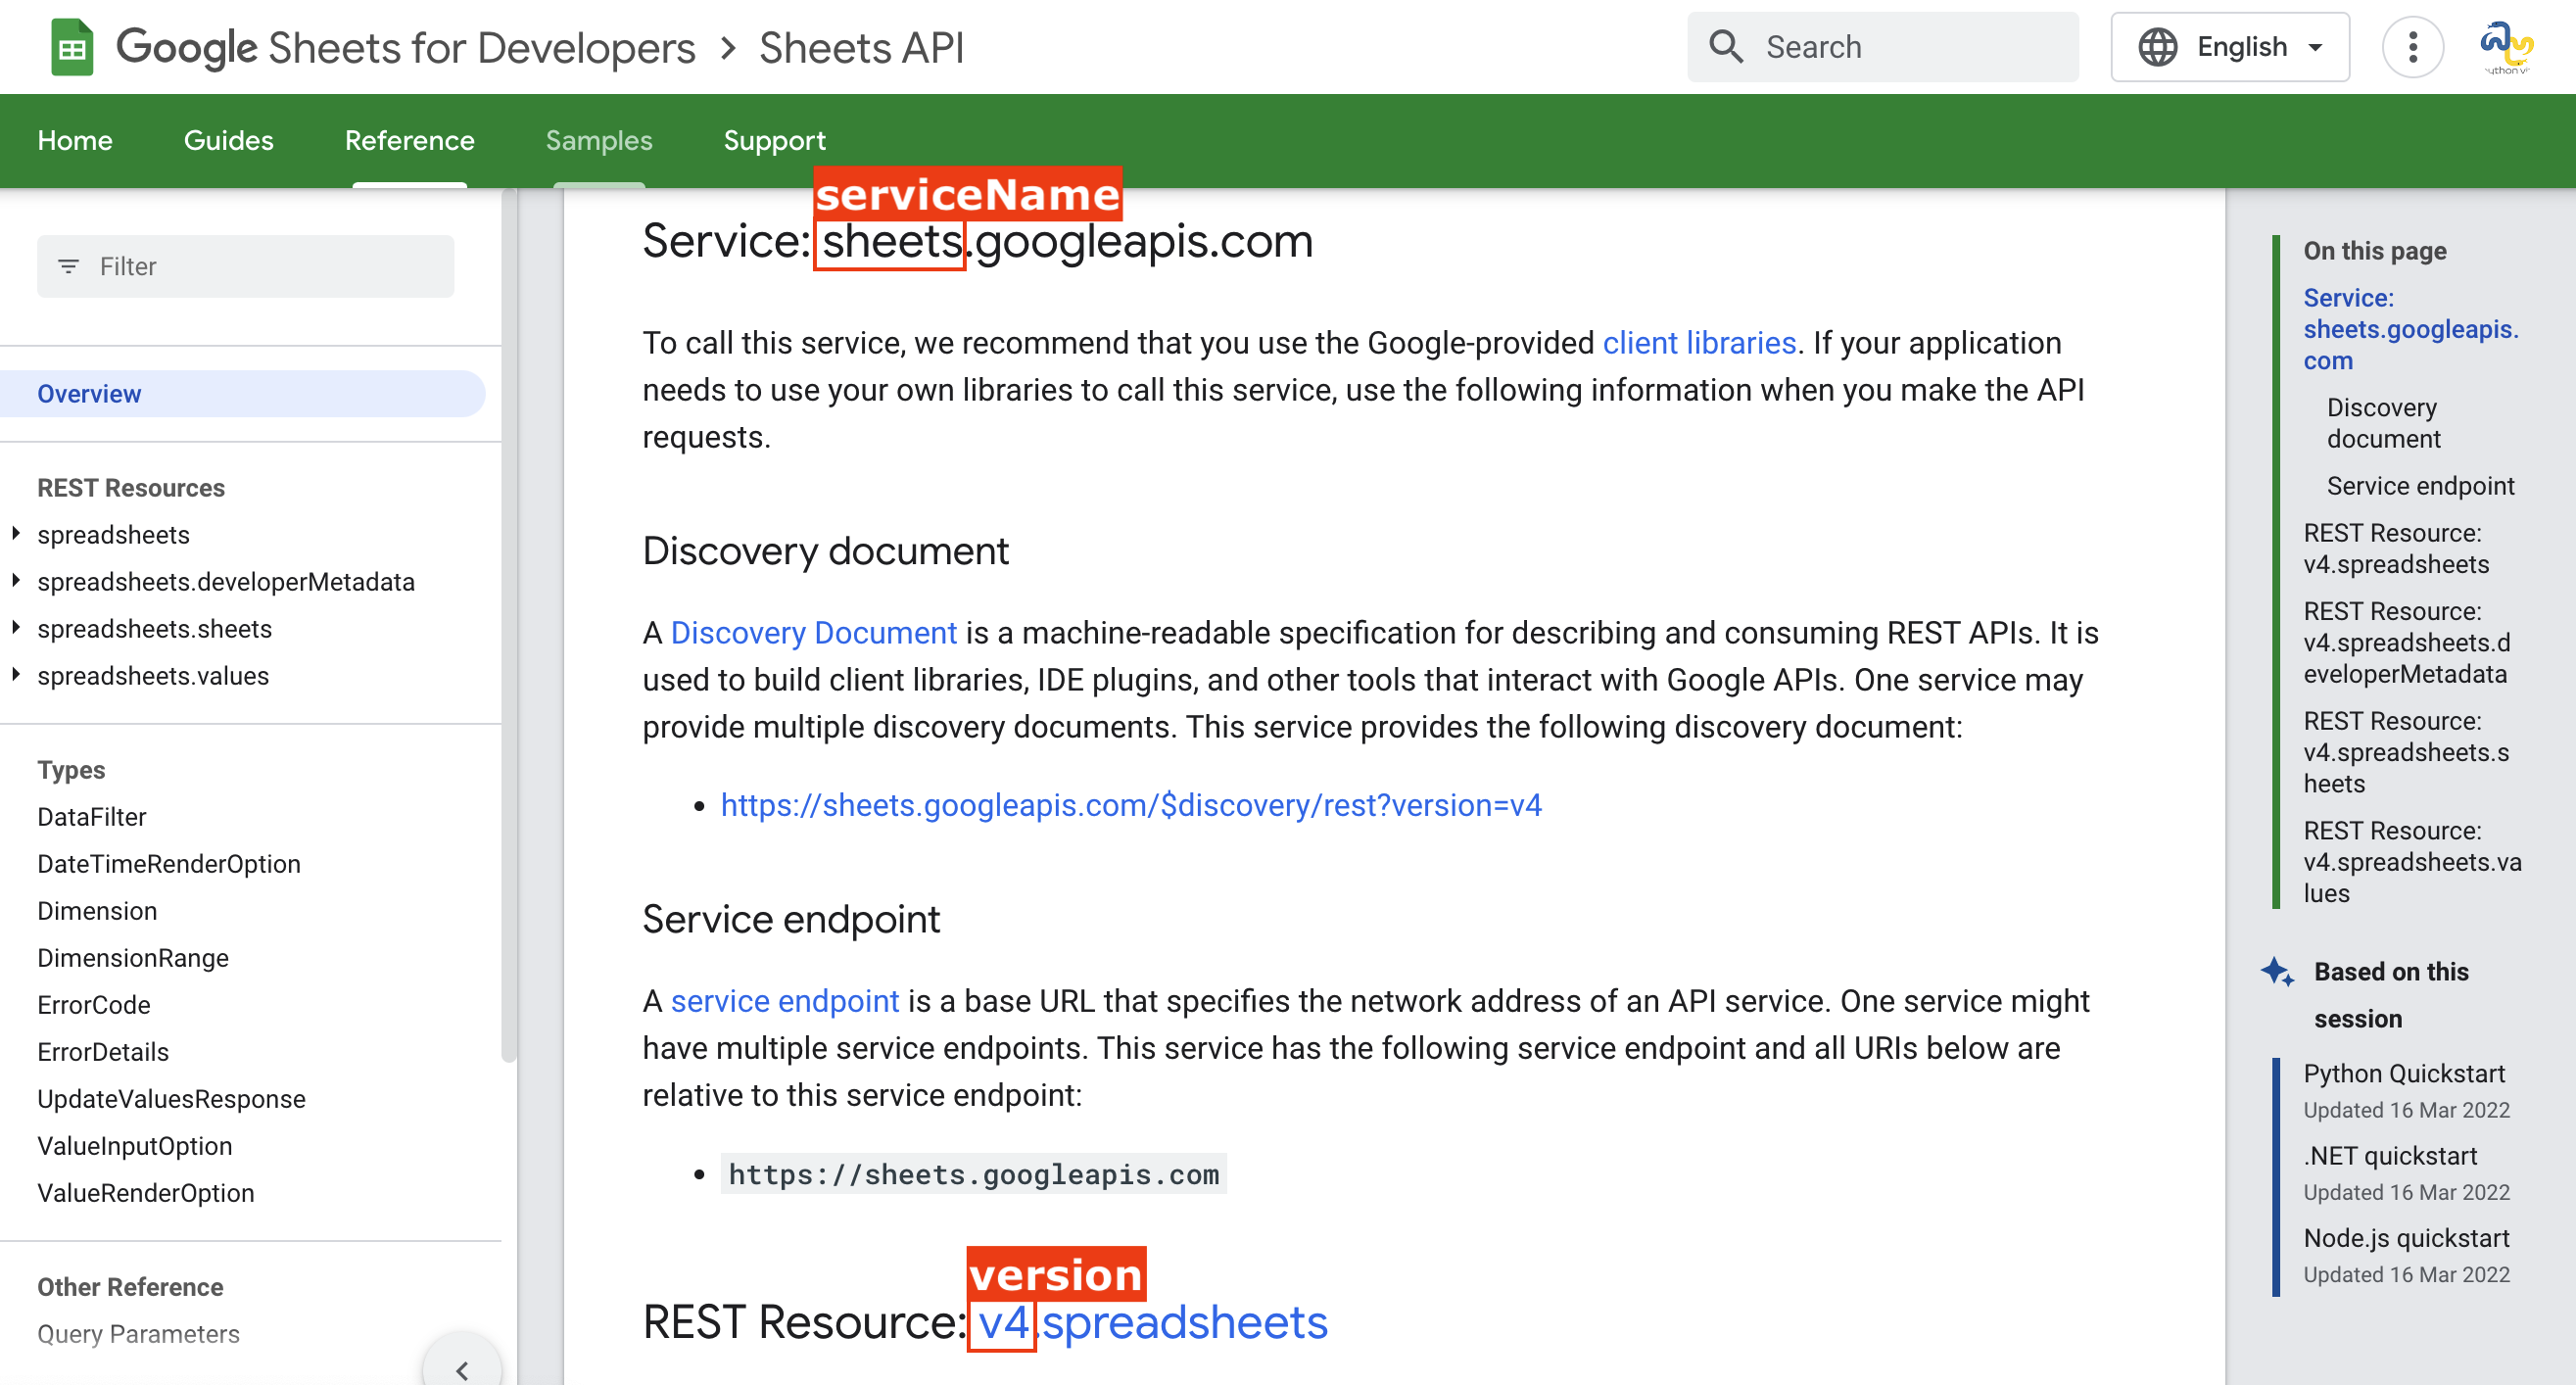
serviceName和version:我們可以在開頭提過的 Google API Explorer 裡找到。例如我們按一下「Google Sheets API」,會找到「sheets.googleapis.com」和「v4._____ 」的字眼(如下圖)scope:這是我們在第 2 步「機密範圍」裡設置的權限,例如「’https://www.googleapis.com/auth/spreadsheets’」
現在我們一起來運行 main.py 看看到底發生什麼事吧!
第 6 步:運行 main.py 獲取授權 credentials
我們在 Python Terminal 裡輸入以下指令:
python main.py

我們會立刻見到「Please visit this URL to authorize this application: …」在 Python Terminal 裡出現。同時,我們的瀏覽器亦應該出現新的 Google 登入視窗。如果您沒有看到新的視窗,可以複製連結貼上自己的瀏覽器。
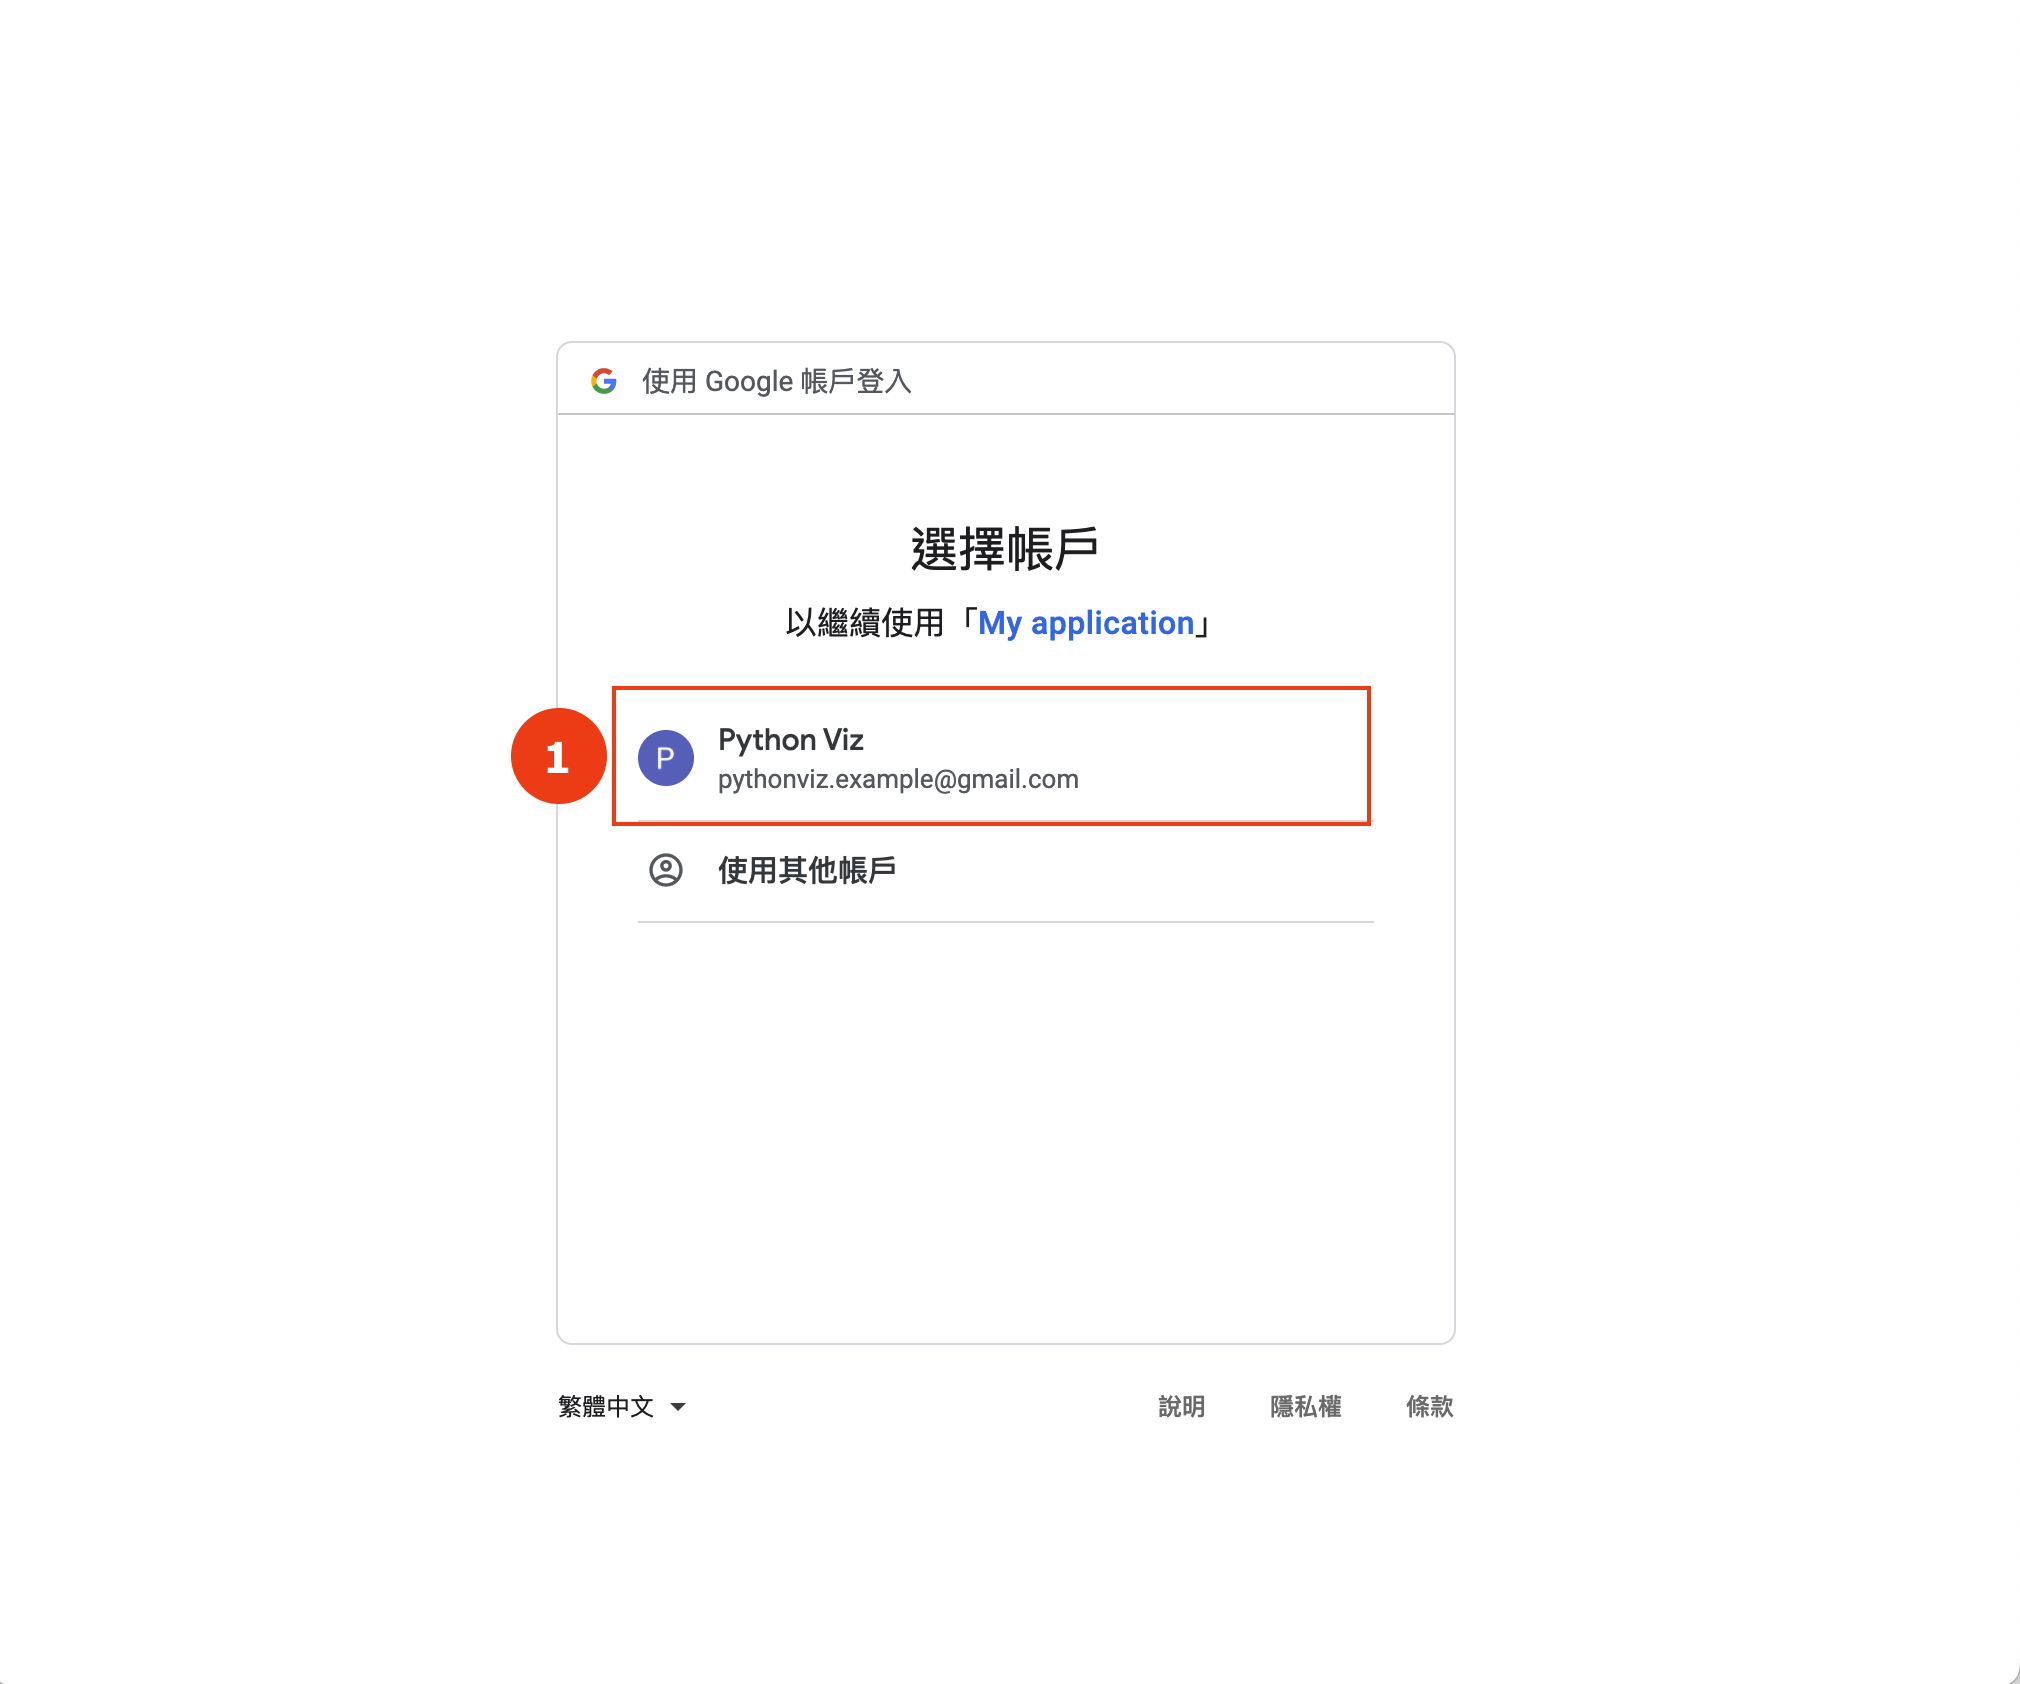
在瀏覽器我們應該會見到自己的 Google 帳戶,並按一下:
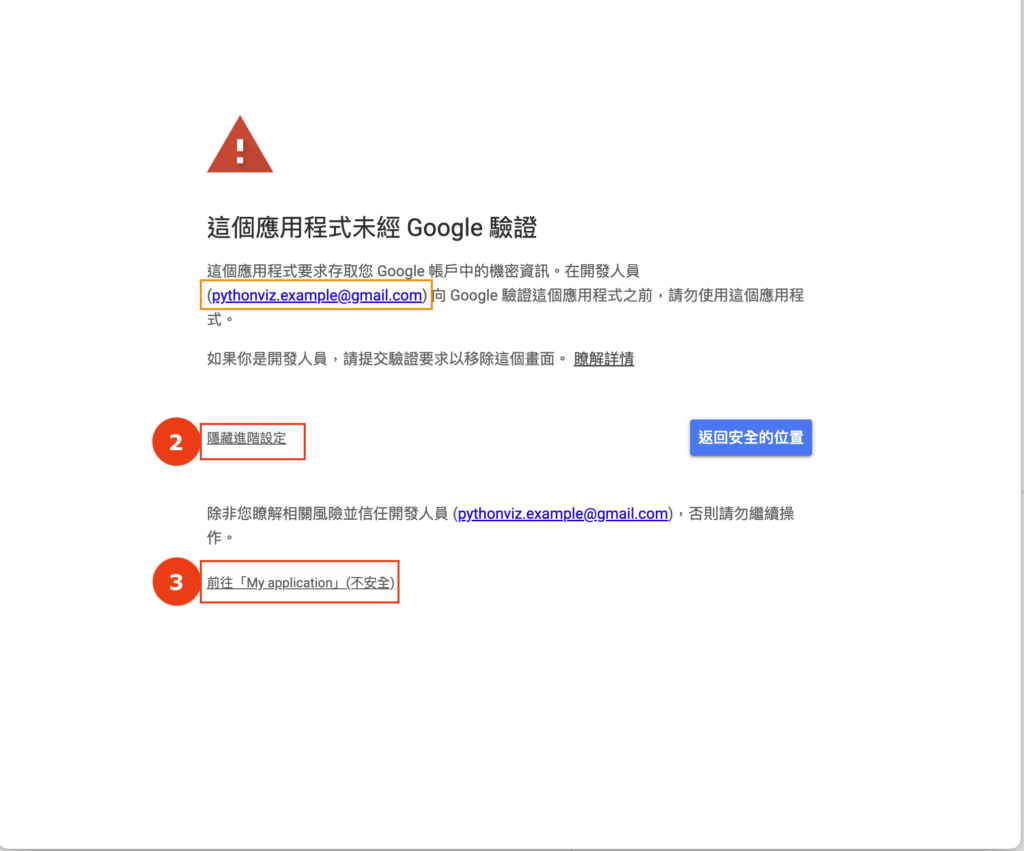
我們應該會見到一個警告的頁面。這是由於我們之前設置的 OAuth 未經過驗證。但由於只有我們自己使用 Python 應用程式,就沒有太大關係。
警告:在這裡記得核對「開發人員電郵」是否自己的電郵!如果我們不小心使用了別人的應用程式,我們的數據可能會被盜!
核對了開發人員資料後,我們按一下「顯示進階設定」,然後「前往『My application』(不安全)」。
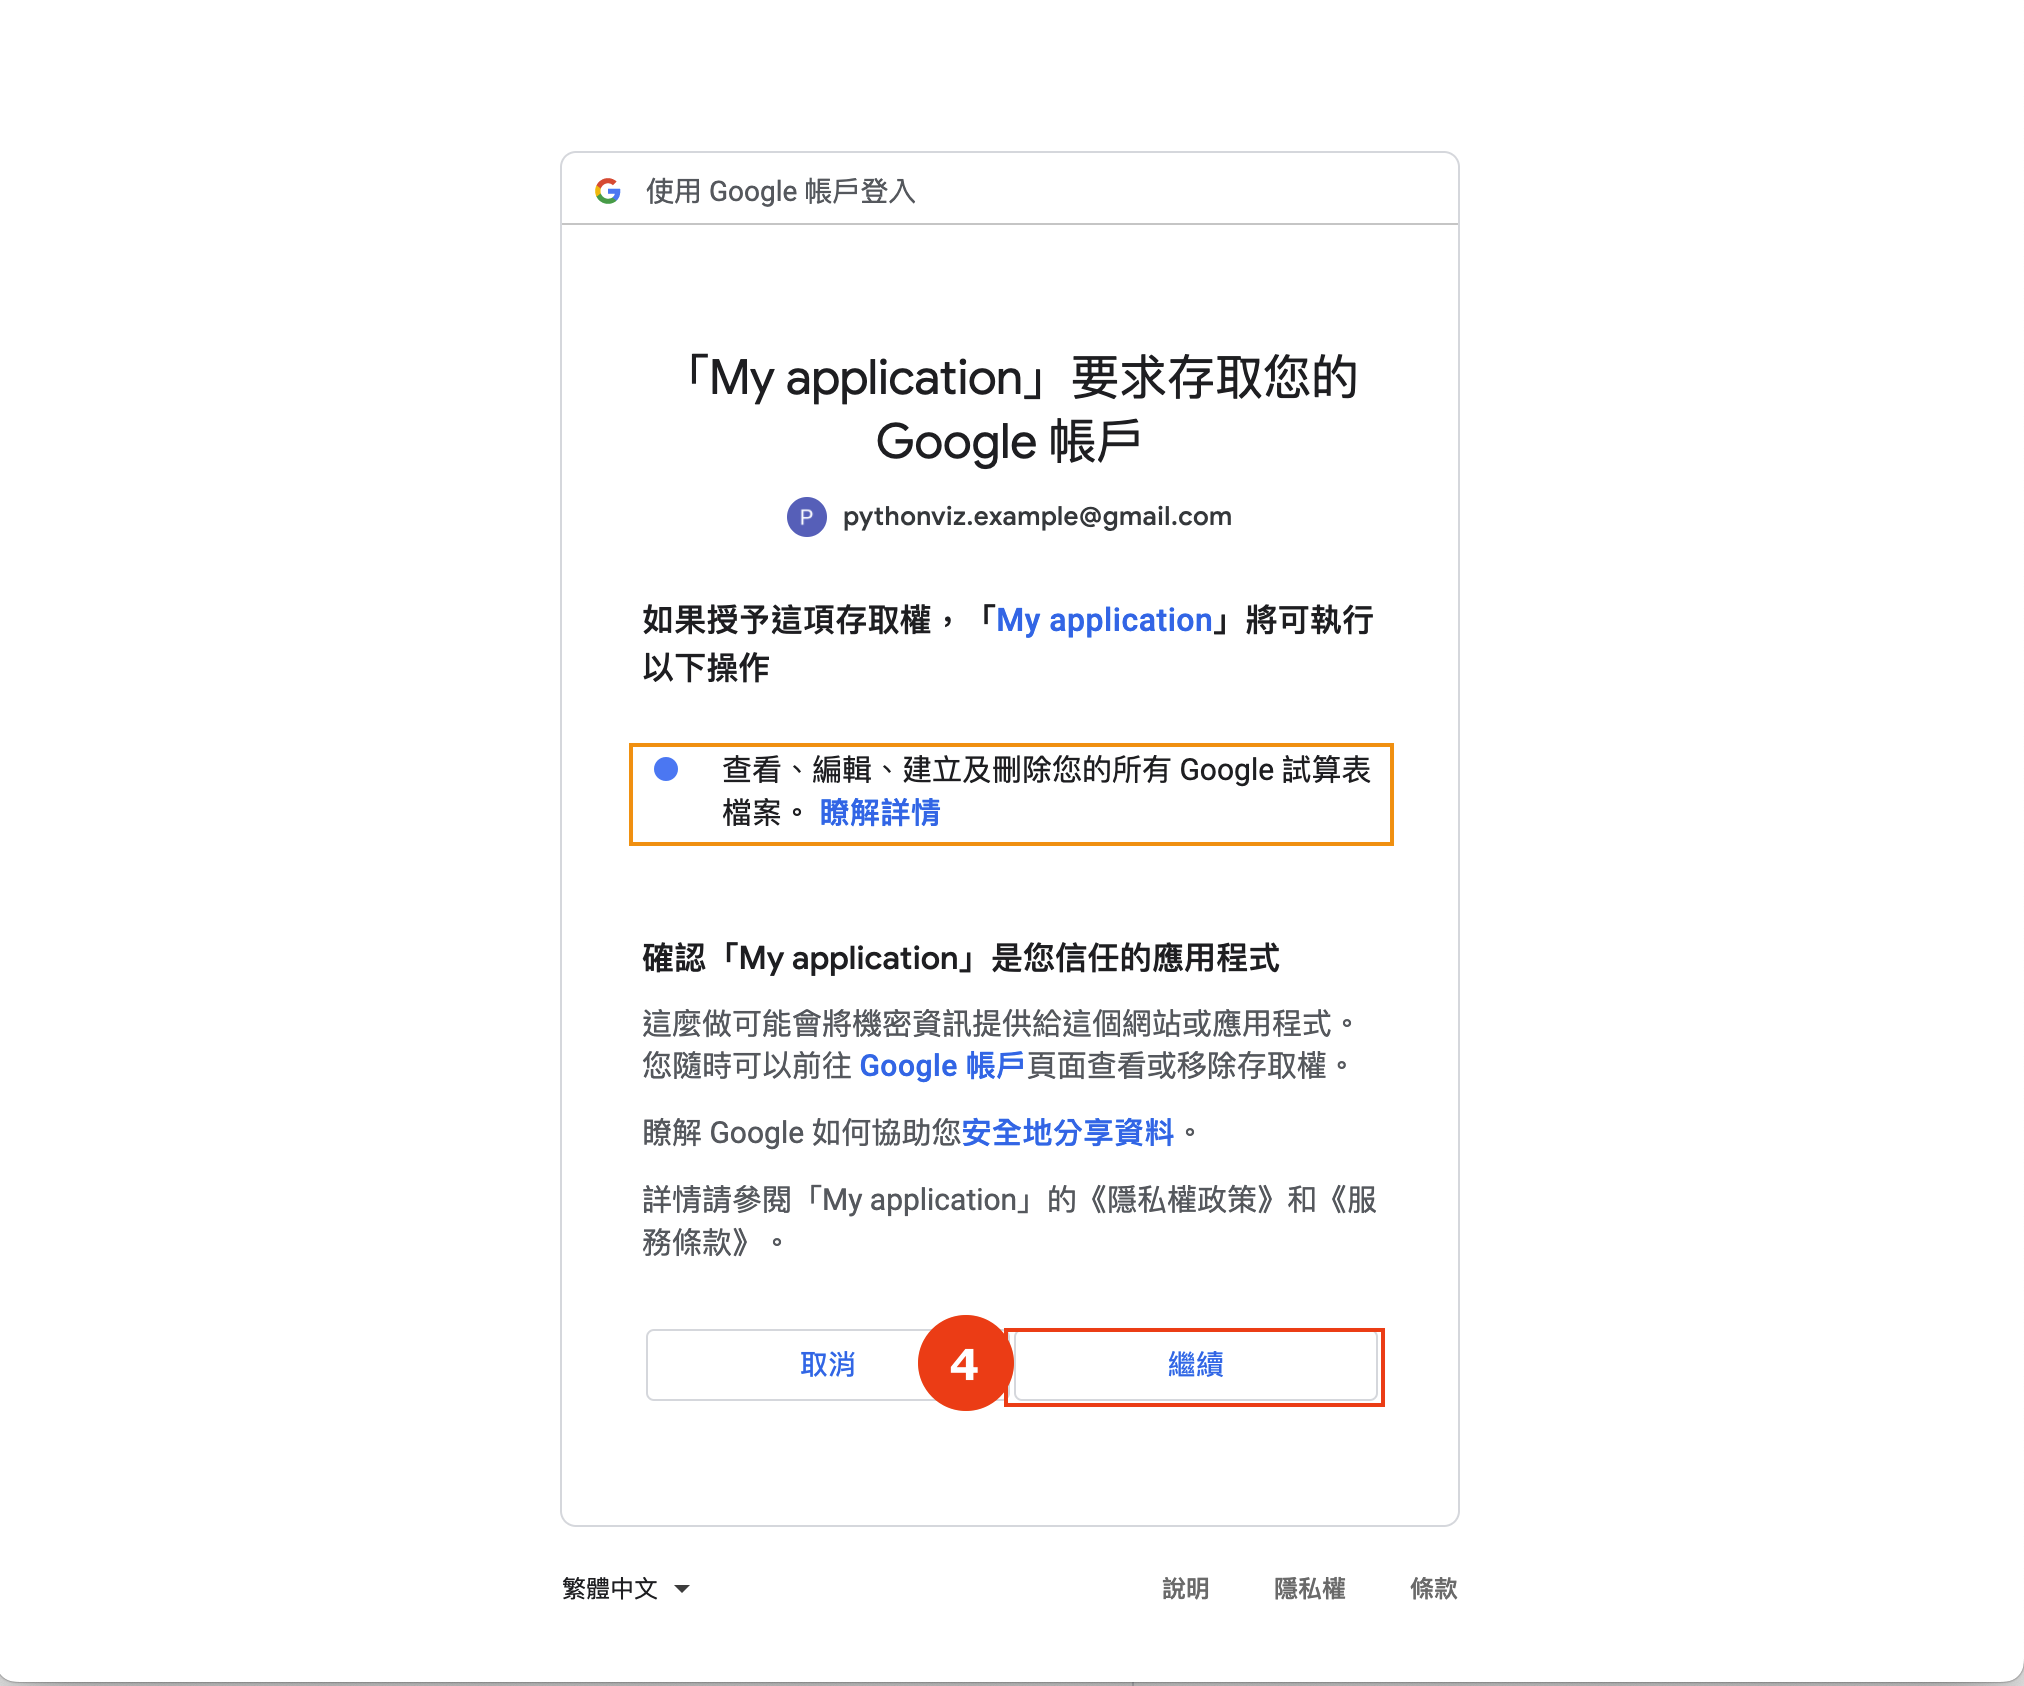
在這一頁我們應該會見到 Google 列出我們剛才在 Google Cloud 選擇的 API 服務範圍。
警告:記得核對這頁的權限是否我們剛才在 Google Cloud 裡選取的 API 服務範圍,否則我們的資料可能被盜!
滿意後,我們按一下「繼續」:“
完成後,我們應該會在瀏覽器見到這個頁面:

回到 Python,我們應該會見到以下:
- 在 Python Terminal 裡出現「<googleapiclient.discovery.Resource object at 0xXXXXXXXXX>」的一行。這是我們在 main.py 第41 行的輸出,代表我們所需的
googleAPIService已被建立,可以用作存取 Google 帳戶數據 - 在 .credentials 的文件夾出現新的「cred.json」。這是我們儲存用戶授權(credentials)的檔案。每次我們運行 Python 應用程式時,Python 便會閱讀這個檔案以獲取所需的 Google API 授權
警告:這個 cred.json 含有用戶(例如自己)的機密 Google 帳戶授權資料,切勿跟其他人分享這個檔案!
教學完整代碼
最後送給大家這篇教學的 Python 完整代碼:
結語
這篇教學奠定了我們存取 Google API 服務的基礎。下一篇教學我們來具體使用 Google Sheets API,一起看看這個 Google API client 有多強大吧!


